This covers the initial, Mk1-Mk5 builds. For the most recent project updates, check this post.
Already have one and looking for support guides or parts? Click here for assembly instructions.
Want to buy one? Click here for ordering options.
Just here to see what went into making it? Welcome to my first adventure in prop making.
Mark I

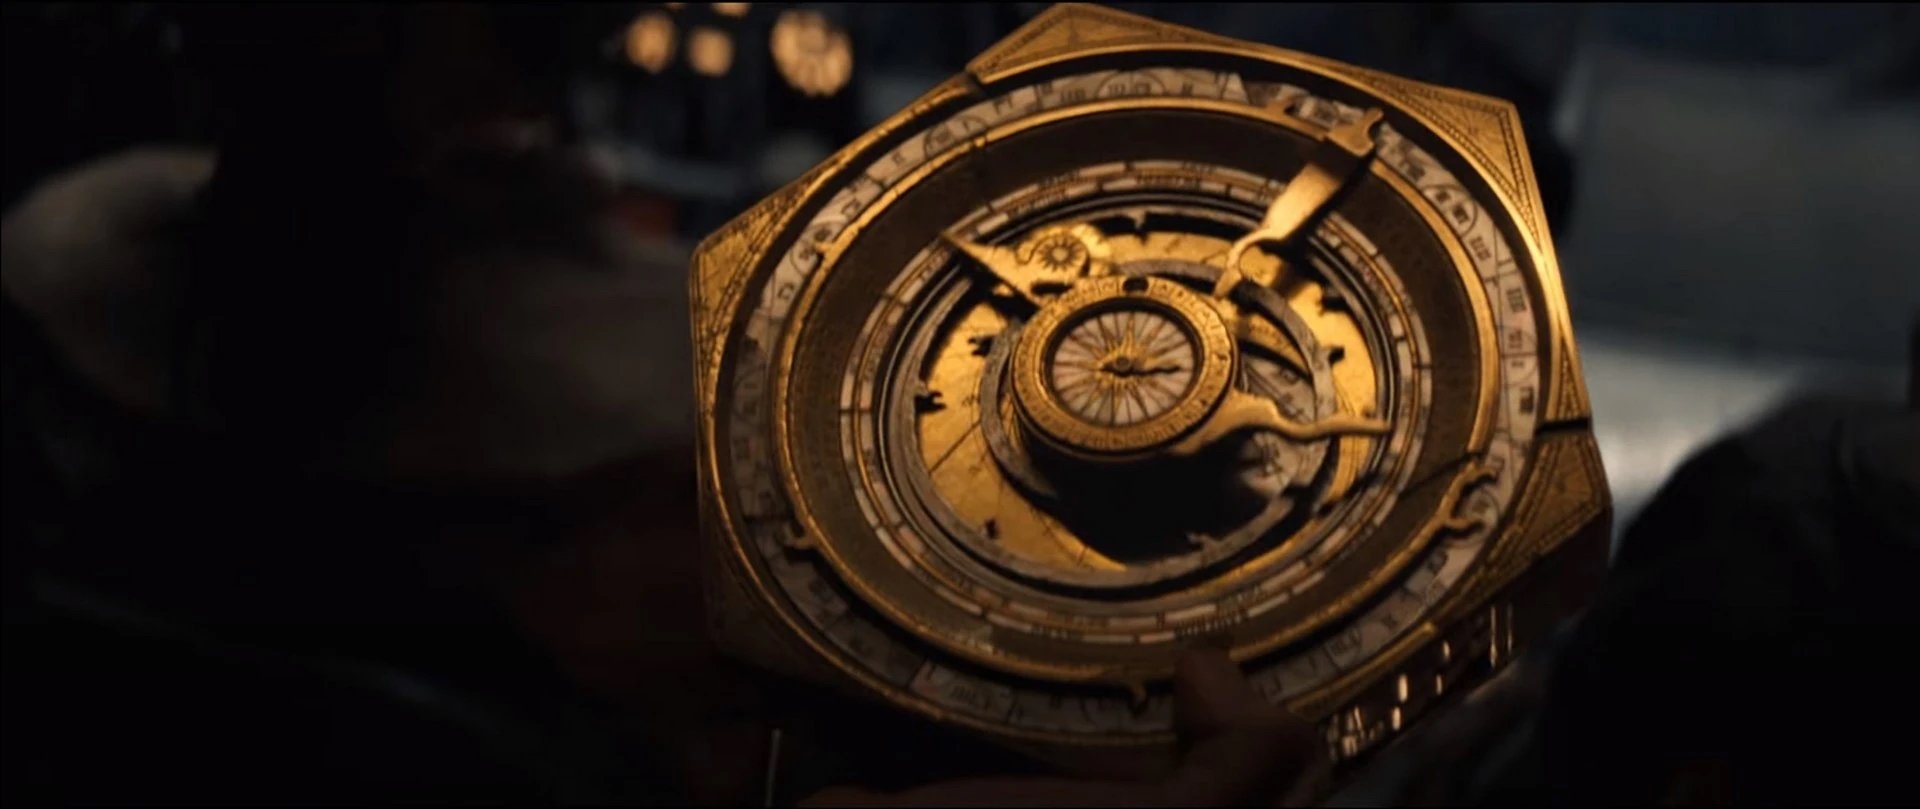
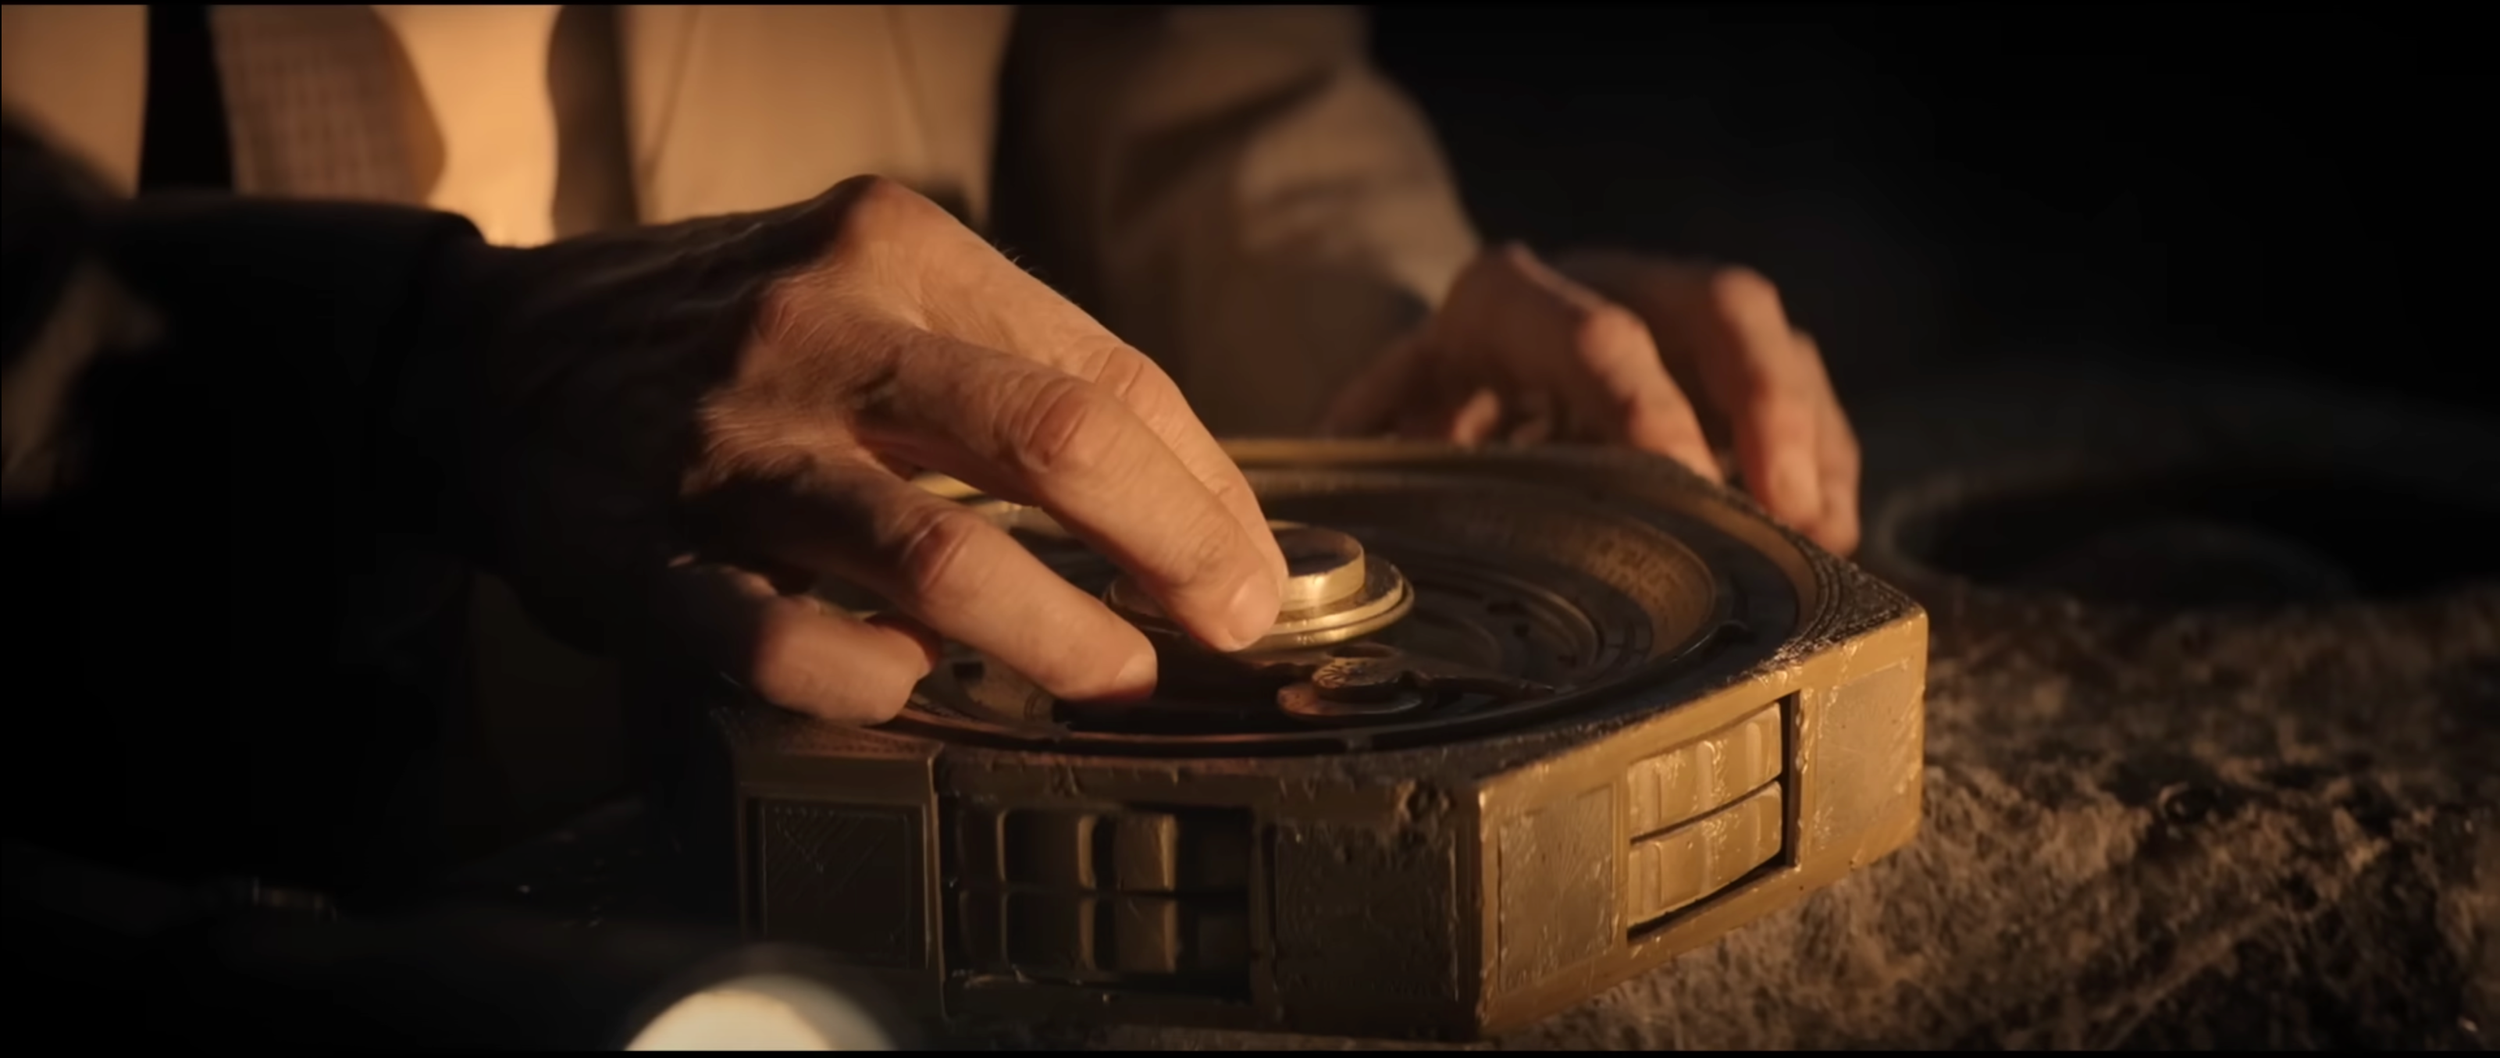
Based on a the single still frame of a (mostly) assembled "Dial of Destiny" from the upcoming Indy movie, I wanted to try my hand at creating a basic approximation of the prop for my basement, bar, gameroom.
A few challenges:
I only have the single still frame grab from the movie trailer to go by
I have a somewhat limited 3d modeling skillset
I have a very limited artistic skillset
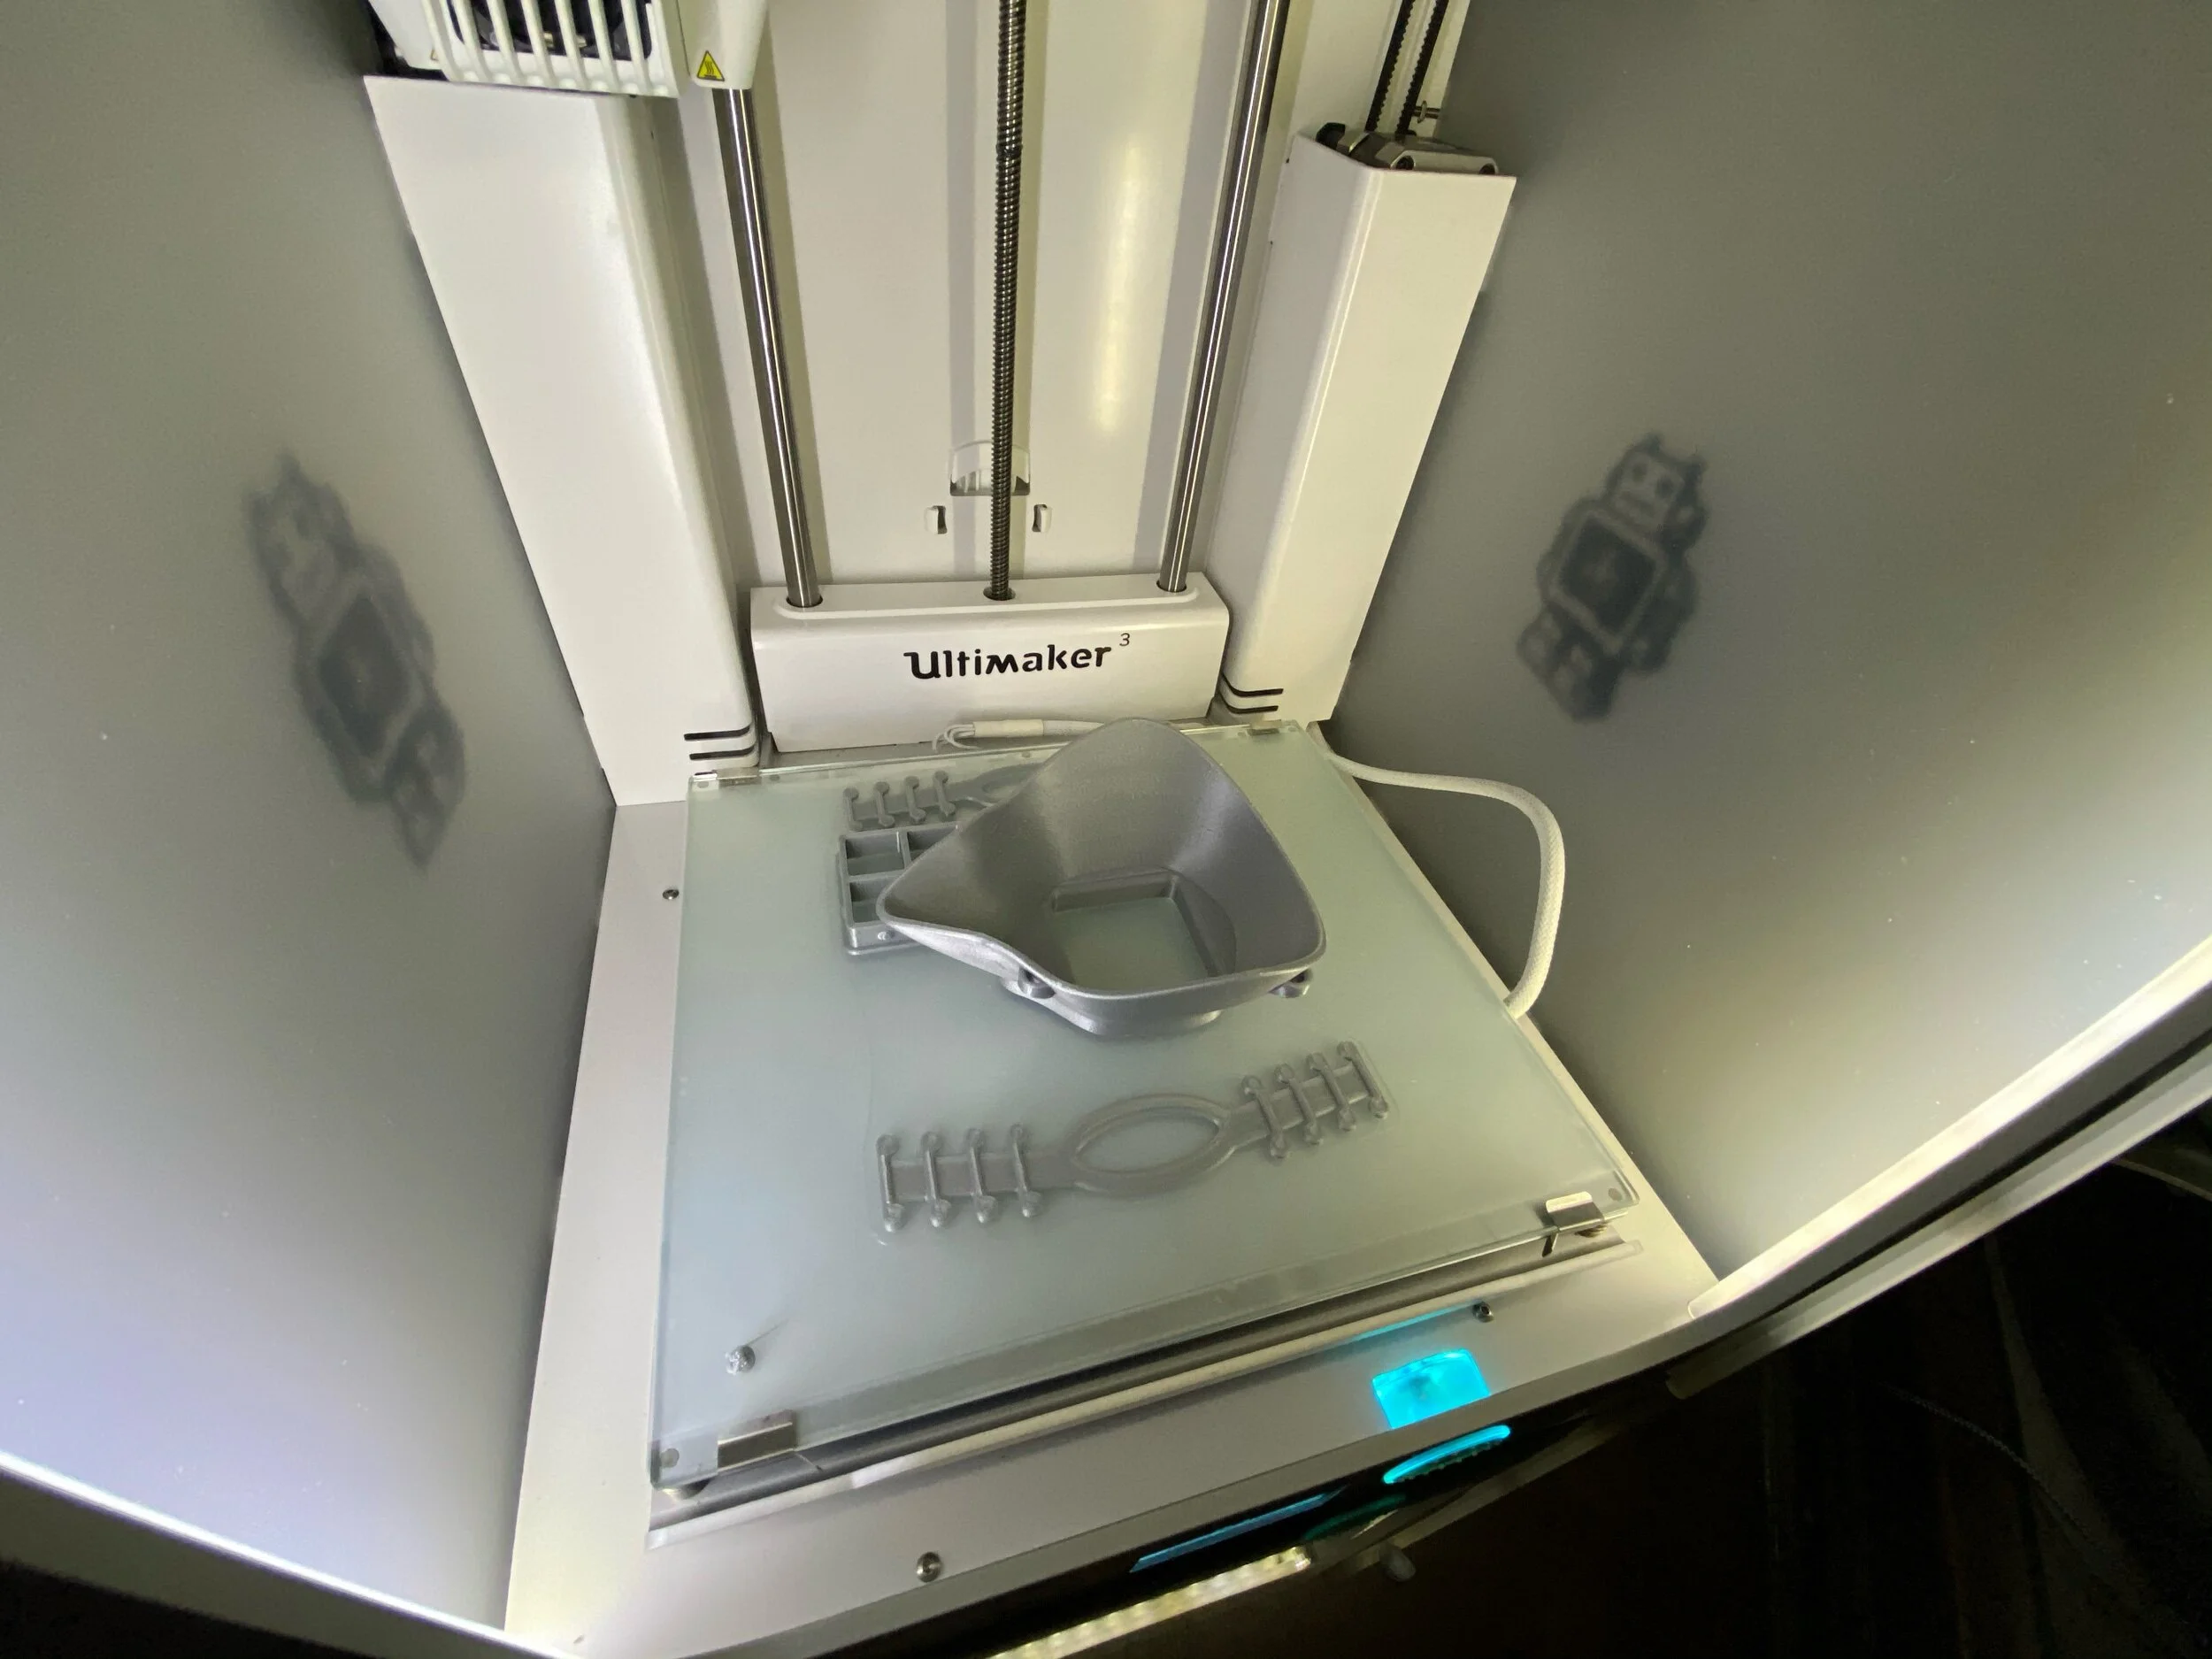
This is a timelapse of most (but not all) of my first attempt at generating a primitive test version of the prop to hold us over until someone more talented can make a detailed version.
STL Files:
https://github.com/graffitilogic/3dPrintStuff/tree/main/Indy/DoD


Prototypes
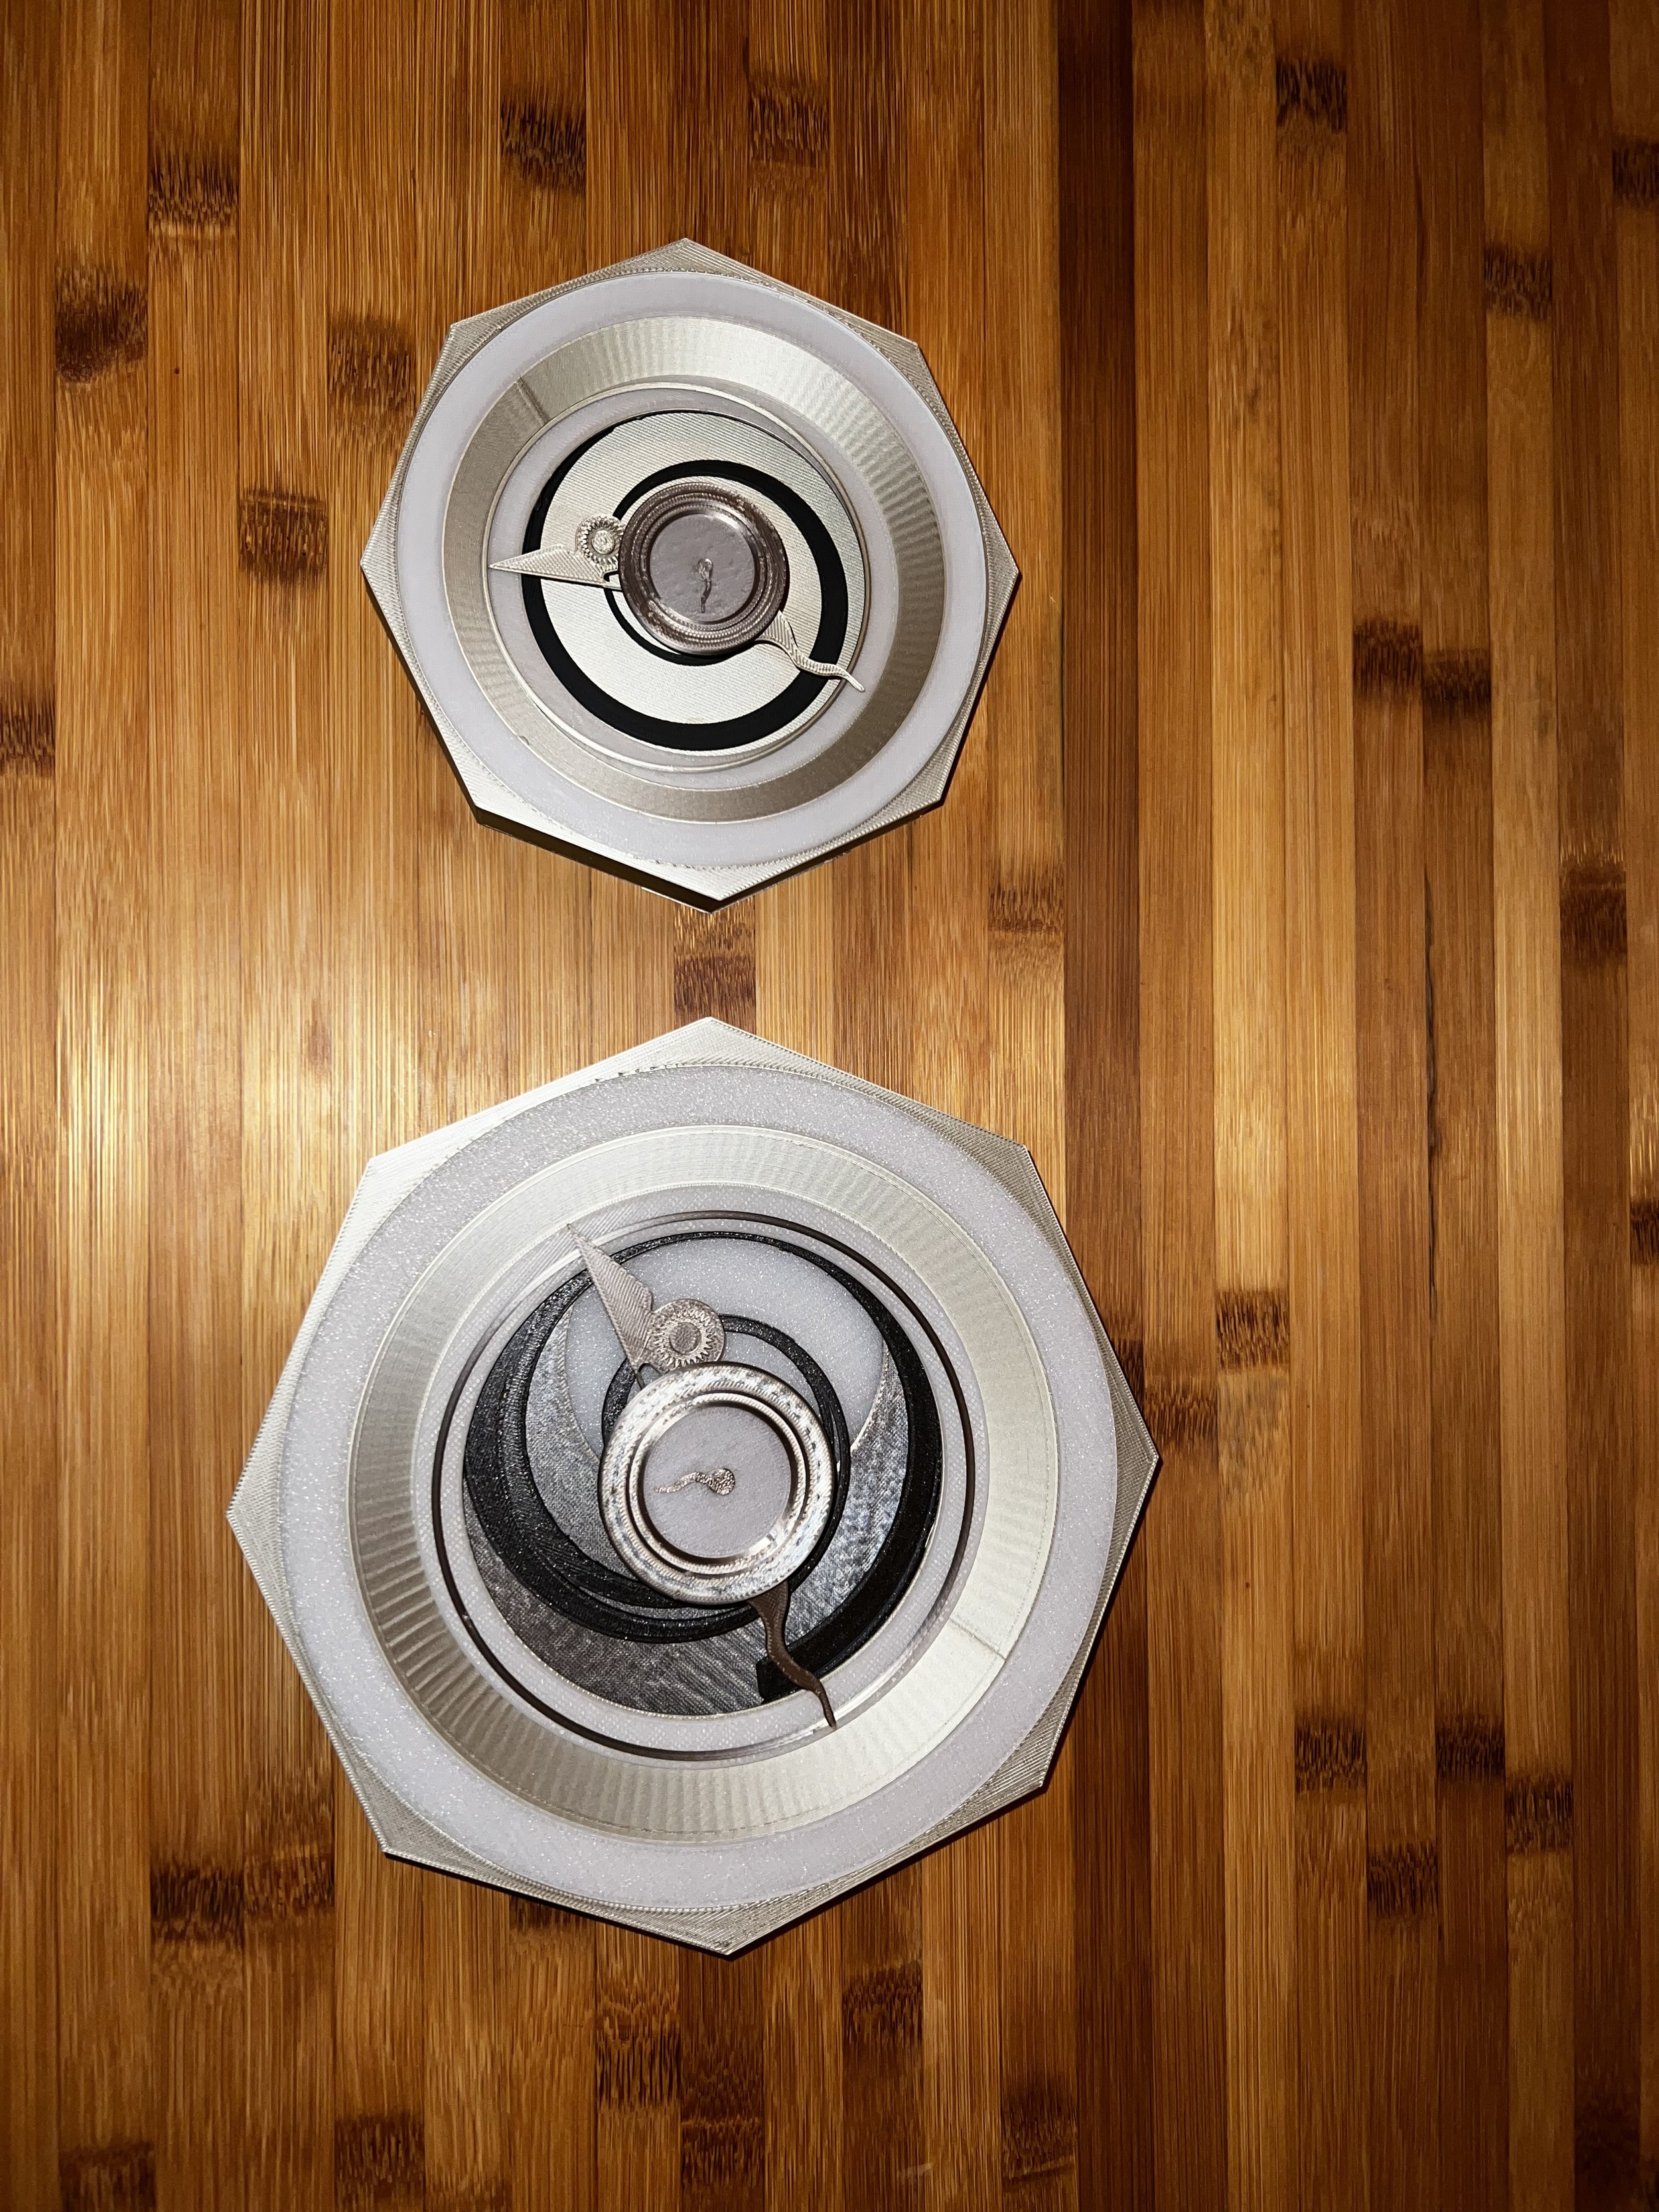
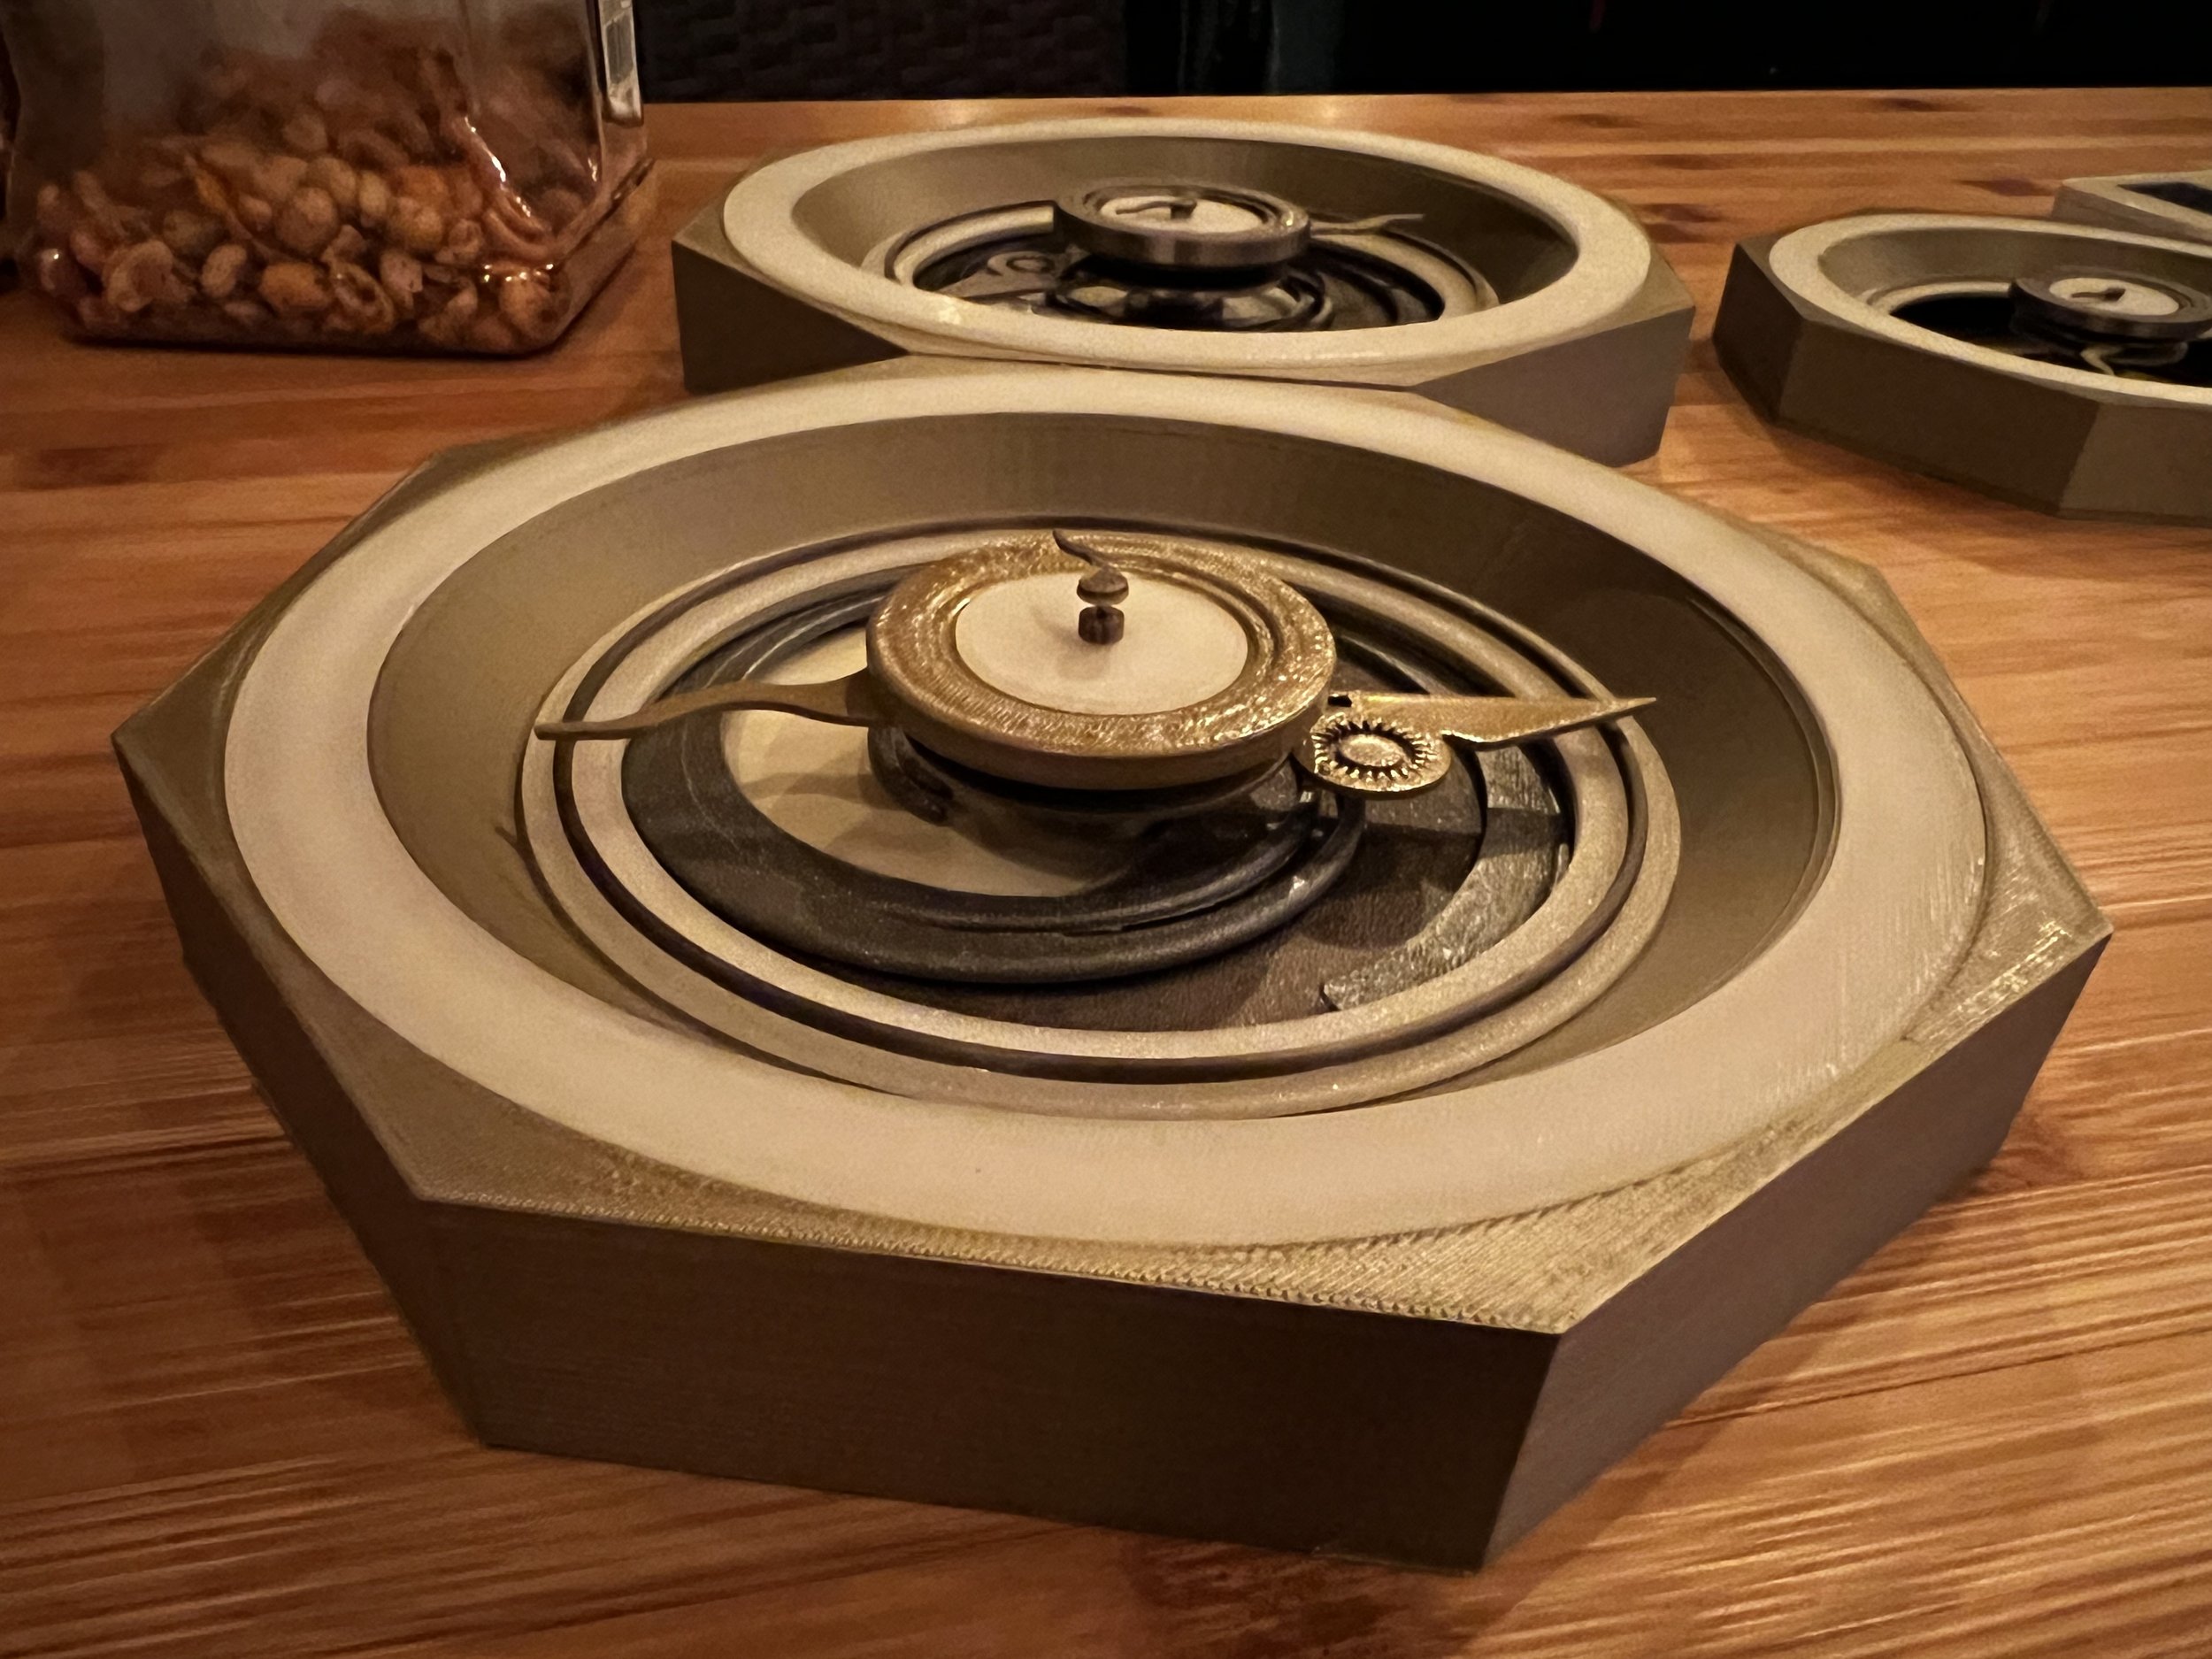
Top: 144mm Test, Bottom: 200mm Test

Top: 144mm Test, Bottom: 200mm Test
“Compass Dial” Workaround


The dial for the center compass-like mech is very small and the post that engages from it is entirely too small to reliably function. The first time someone turns it and it catches any resistance, it will snap off. As a workaround for now, I glued a part of a paperclip to the dial.
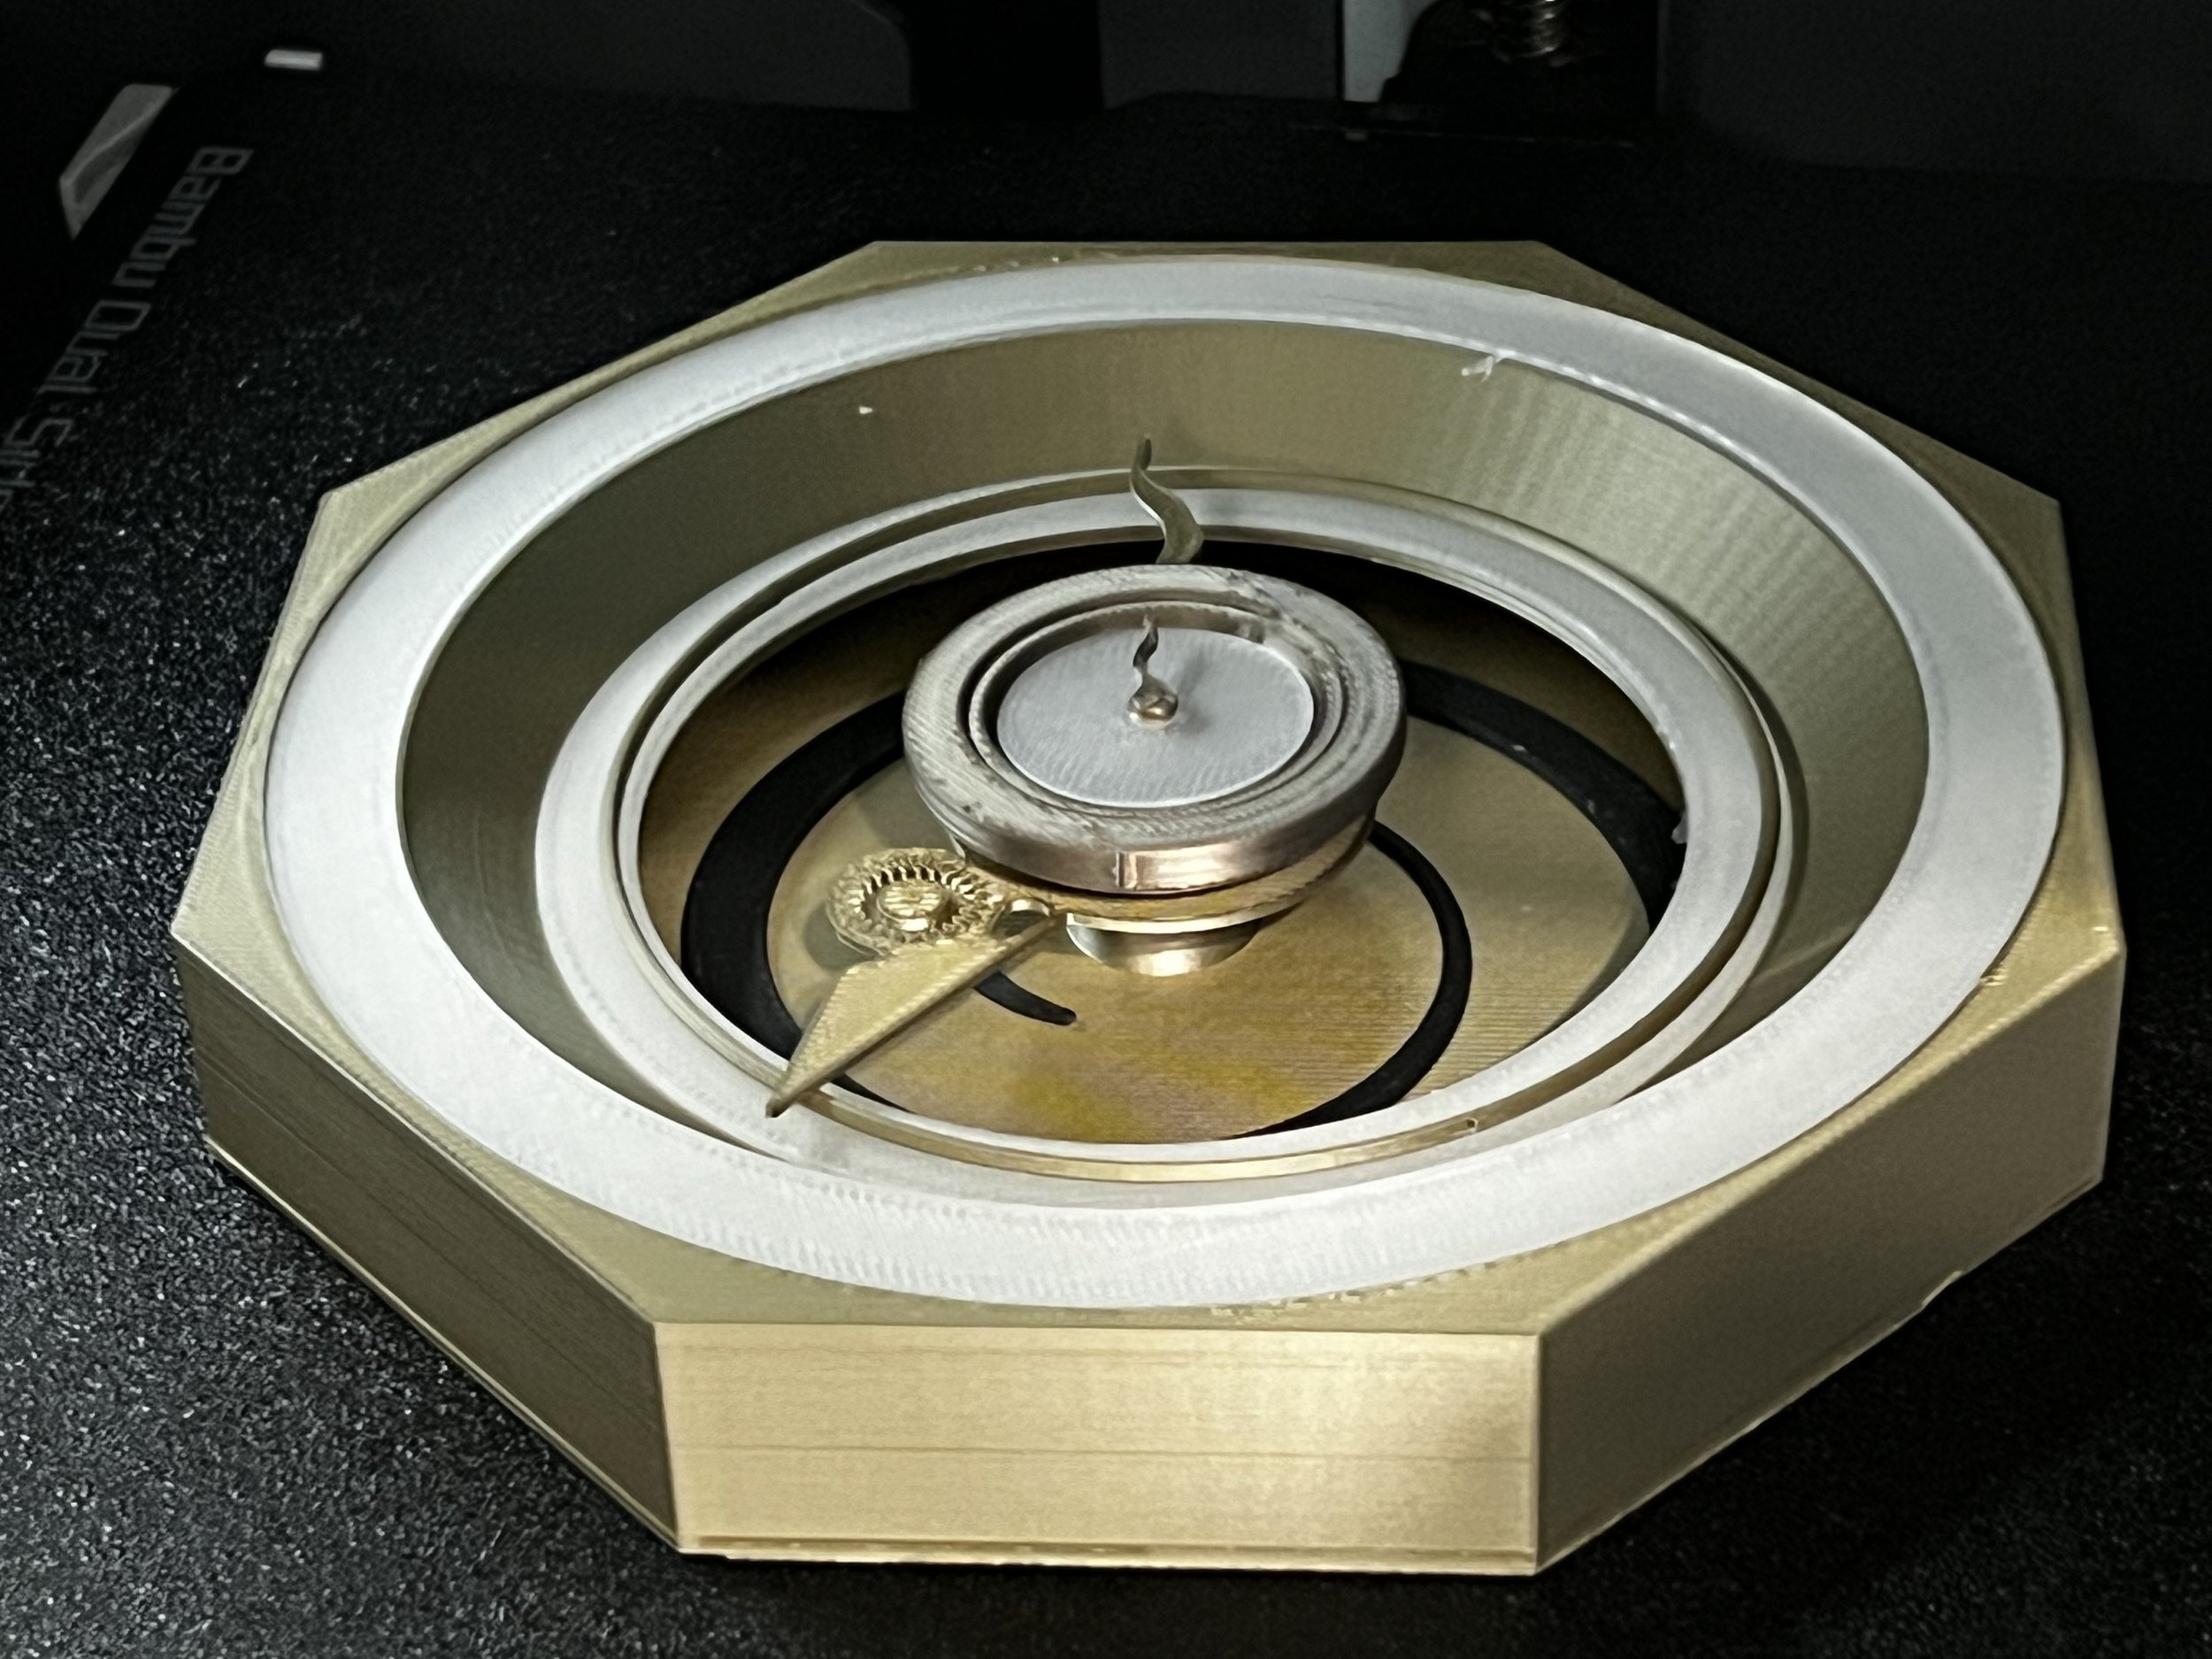
240mm Build

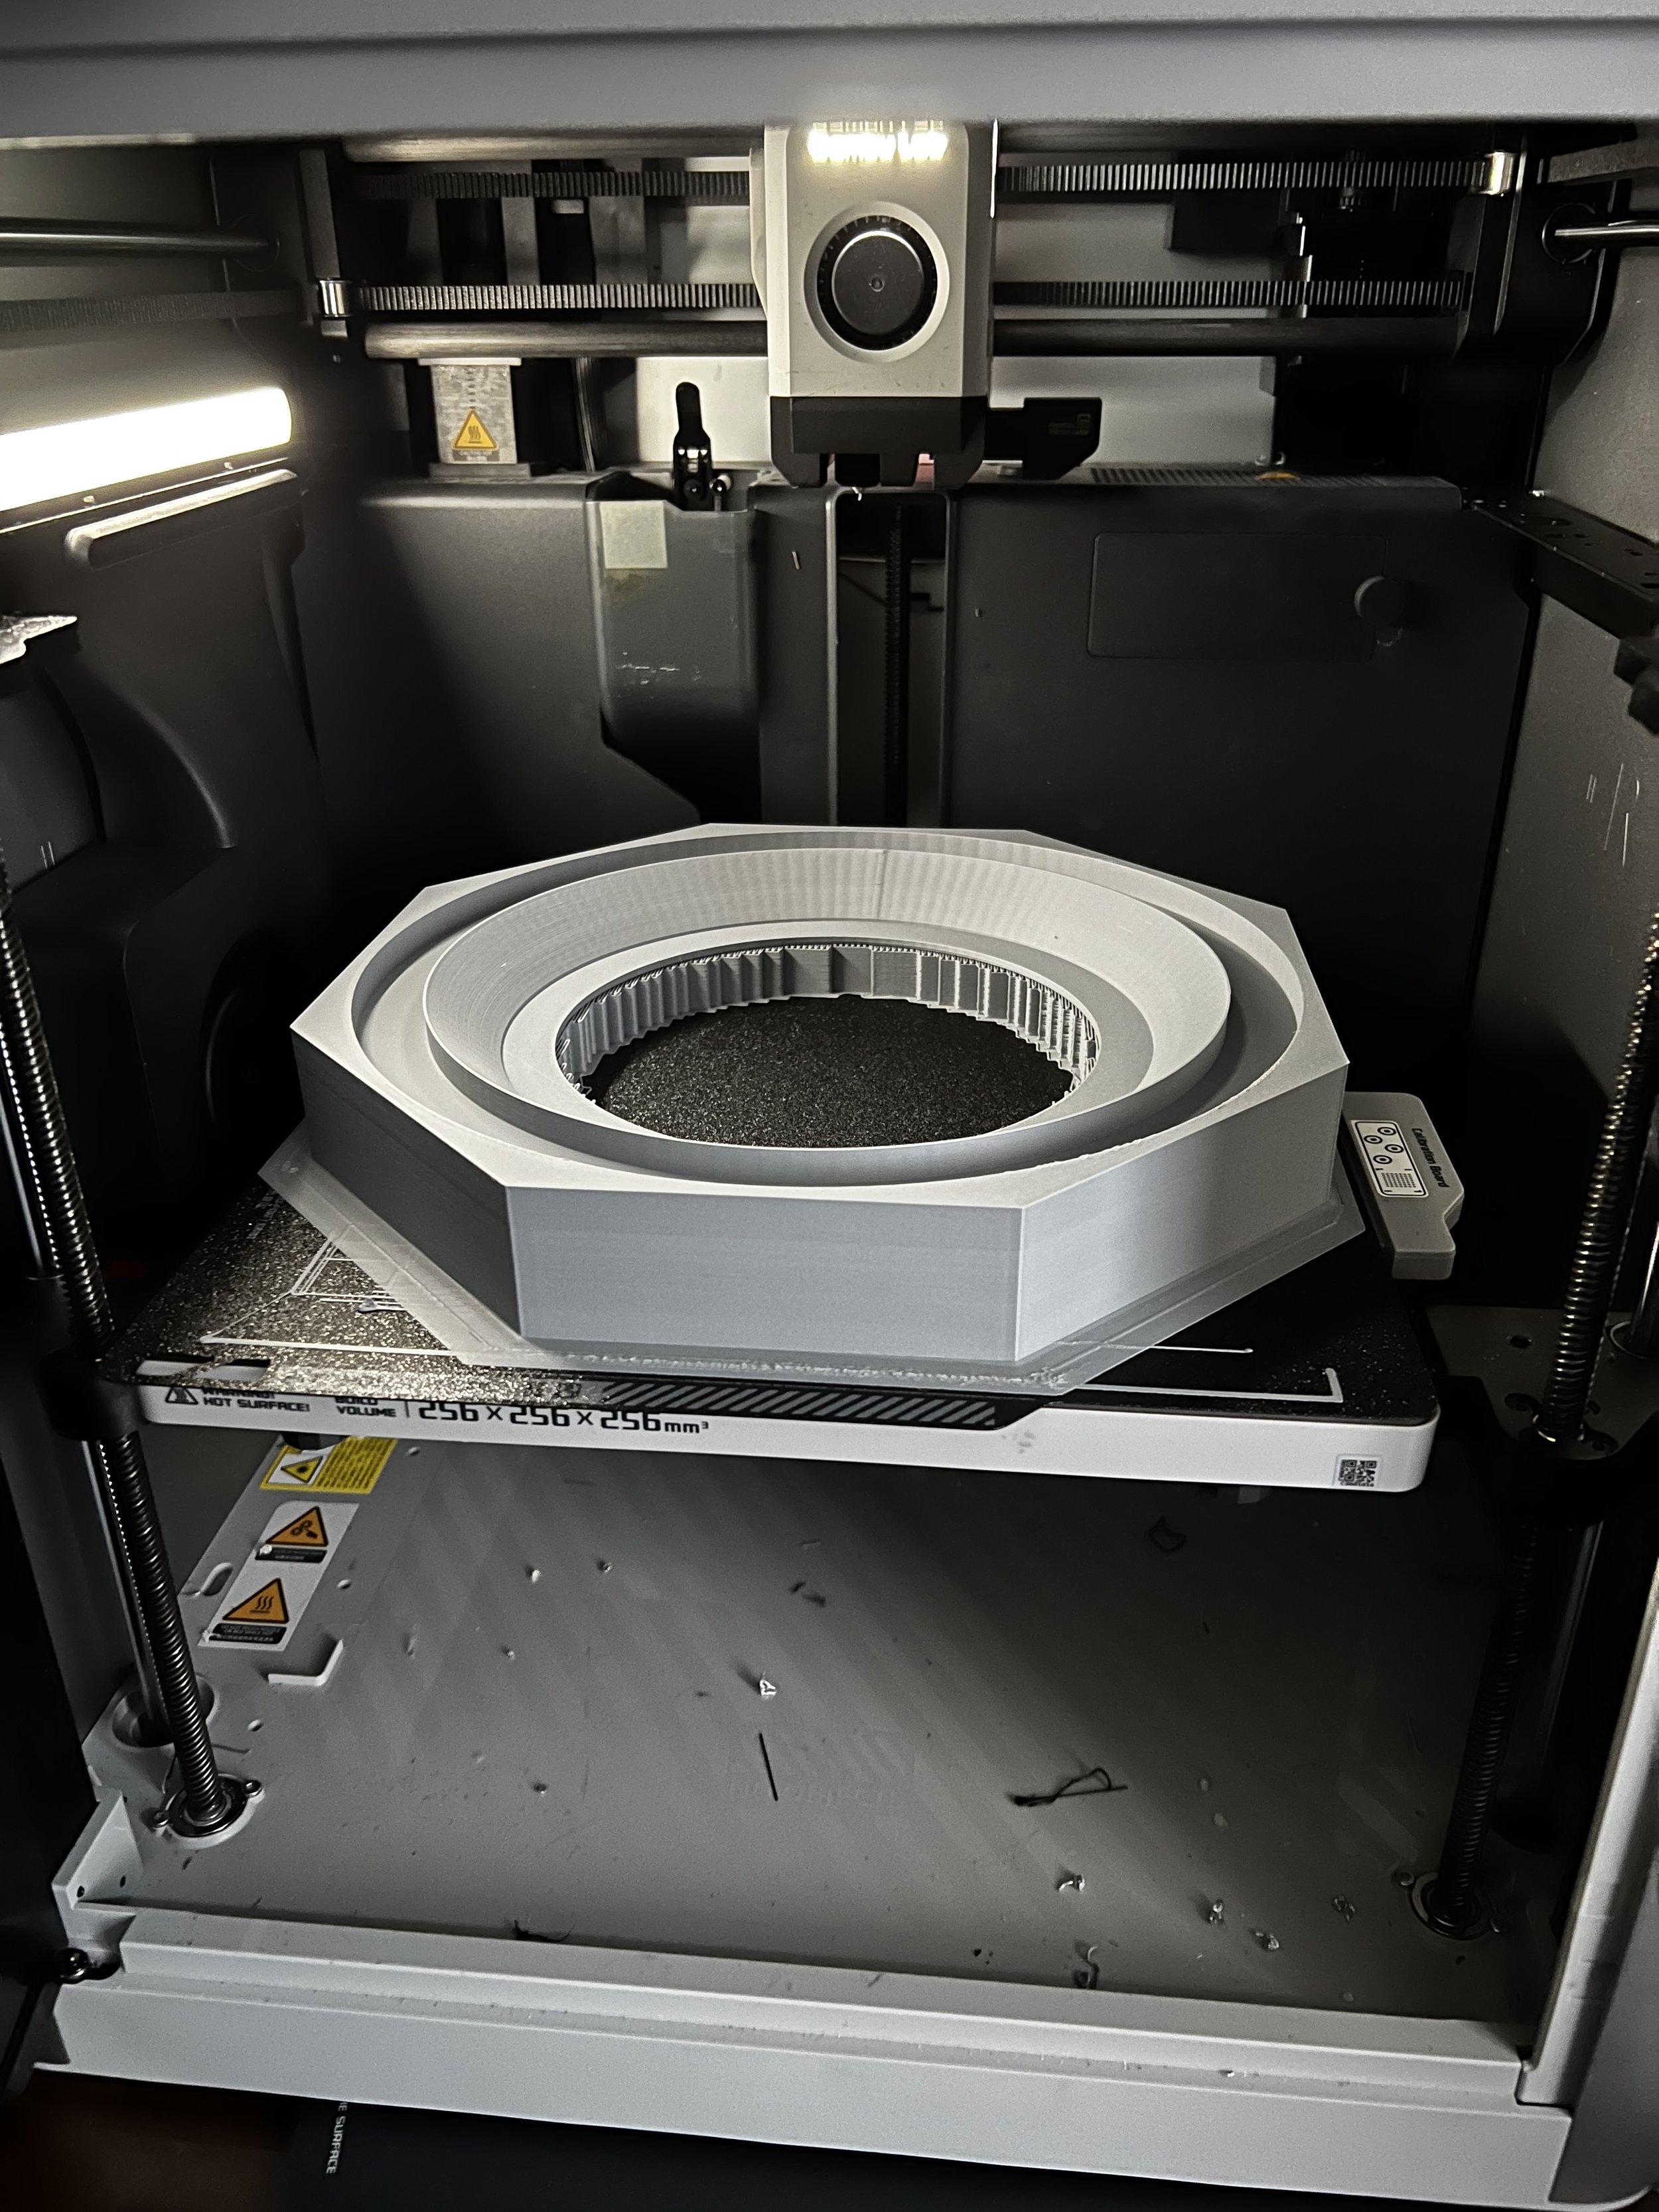
Even at 240mm I think the dial rod is too small, so “paperclip thing” was used again.

Insets

I’ve always been bad at art..
Assembly Instructions
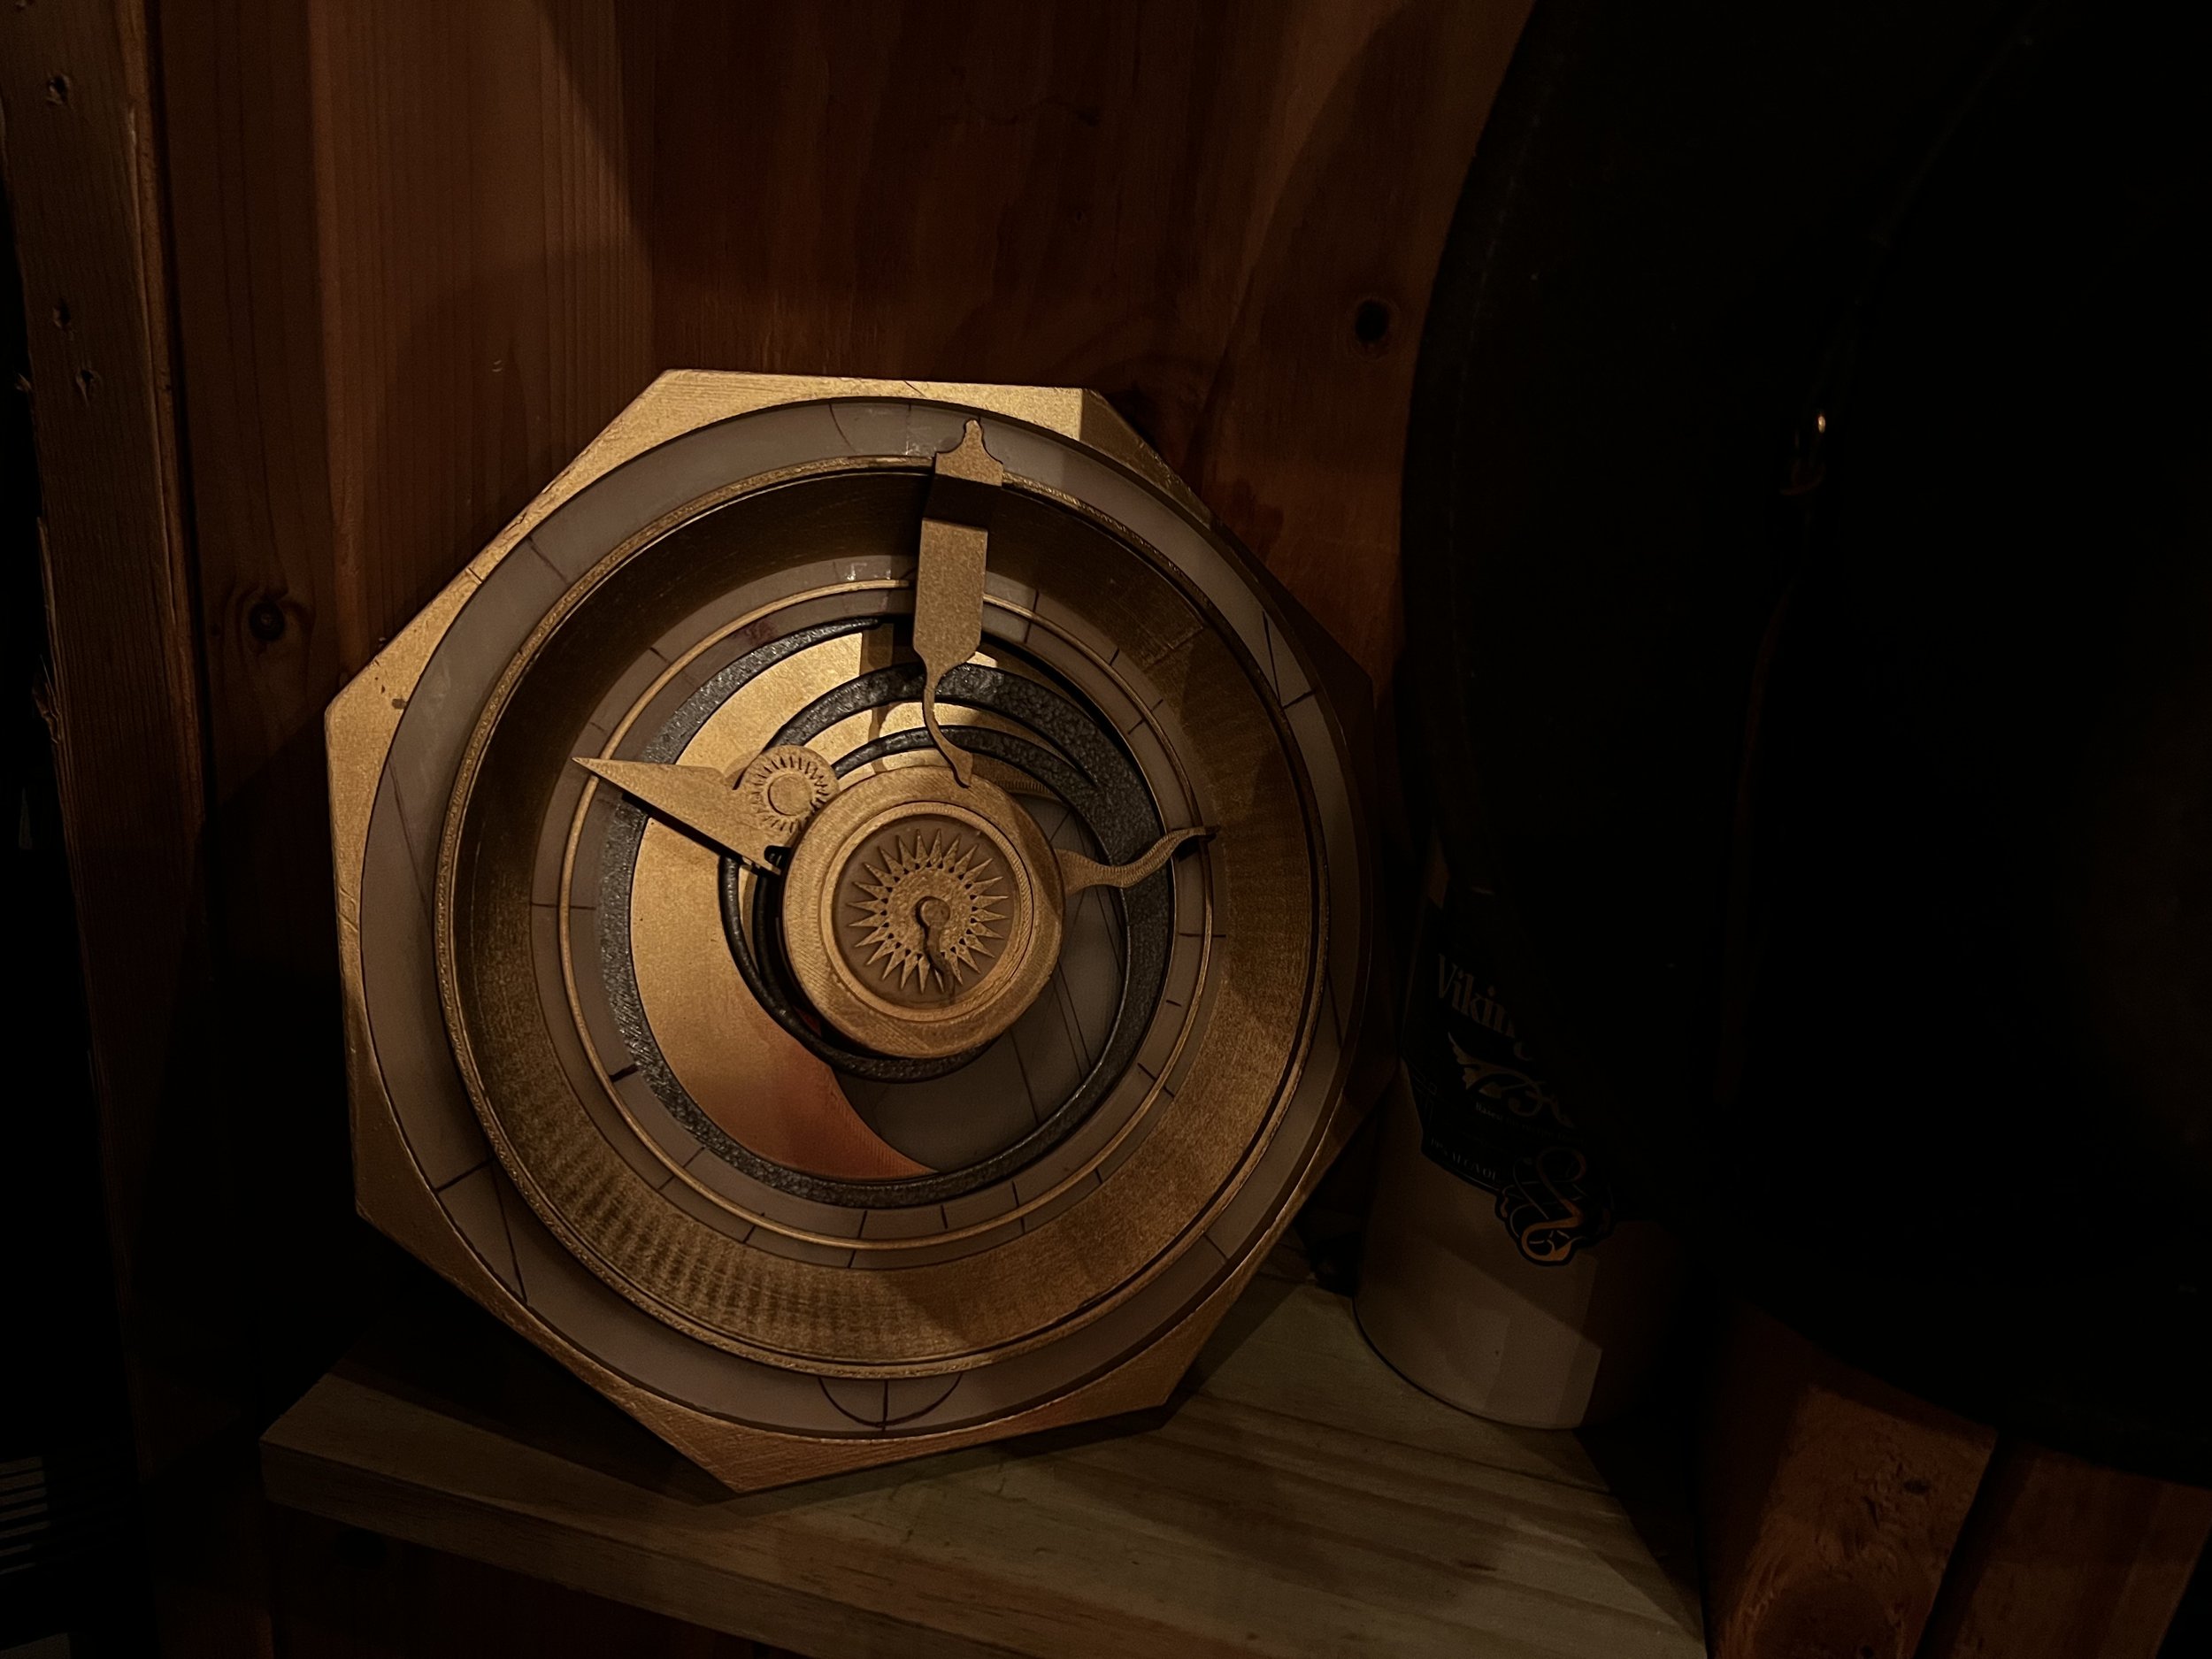
Mark 1.5ish
Late May 2023 Update - 6 sides, Side details
DOH. It’s not 8-sided.
An anonymous emailer, supposedly familiar with the production told me the prop was going to be octagonal in shape. This rightfully jived with my confirmation-bias as a programmer that likes math-by-eights. This last trailer gives a better view of the assembled mechanism and it uhh… isn’t octagonal. So… yeah.. Need to fix that.
A new promo trailer came out with some new stills to potentially harvest some early details about the prop.

Central glyph disc from the bottom of the Dial? (Or…. map that leads the heroes to parts of the artifact?)

Assuming this is related to the bottom glyph disc of the prop, we can extrapolate some rough sizing estimates..

The Upper Compass-like mechanism perhaps?
Additional Side Details
The additional details set me down a path to adjust my own personally-built model above with additional side details and some slight size adjustments.

Told ya by art-fu was weak! :)

The biggest issue that I’ve had with the side details was printing them with supports. The channels are so small between those chiclet pieces that I cut myself a few times on the tiny support wires that were generated to fill the channels.

The May 2023 Dial turned out pretty good., except that its the wrong shape! :\
Mid June Update


To work around the support headache of the side details, I separated the chiclet-box-things into their own prints and left inset cutouts for easy glueing and snapping of the details into the box-sides. In order to accommodate this, it was necessary the expand the box sides a little while trying to preserve the internal scaling ratios.
By mid June, I started trying to add in some of the extra detail from the top of the box design. Each point of the hexagonal box has an elongated pyramid with tiny details. Looks a little like a landscape, sun-ray pictograph to my eyes. If I did the smallest lines as cutouts in the print, I’m not 100% sure it would translate well in larger layer-height and nozzle-size print configurations. For now at least, I’ve added a small cutout in the shape of the pyramid but missing those fine line details. I exported glue-on outset versions of those top details.

The early screenshot of the assembled dial also shows perpendicular seams on box. I thought it was odd that these seams were not symmetrical points of the hexagonal structure. I’ve resisted so far the urge to add these cutouts until I can see the film and see how persistent the seams are within the film. I suspect that the assembly in film will slide together and these will be left as seams but not necessary raised relief as pictured here.

At this scale, drawing the little sun + raw pictograph would be a challenge for me. I enabled Archimedean Chords for the top layers and the printer at least gives me this effect. It isn’t perfect but I’ll take it, for now anyway.
As of mid-June I’m starting to run out of ideas for this current design. I’m mostly happy with it, though. The weak spots are my lack of hand-drawn art skills. Once the movie comes out and I can get more detail on the glyphs I might end up trying to build something that is printable for the glyph areas. (Like a transfer sheet or transparent decal)
Mid June Update 2

Well, I put out into the universe that I was running out of inspiration and ideas and the universe answered the call. In a recent Blog Mickey Post, they announced the reopening of the small Indy store at Hollywood Studios as a temporary bar and snack shop. It has been re-christened the Den of Destiny and features a Dial of Destiny Prop giving us plenty of details to obsess over. I’m told this isn’t a film model and that it was made specifically for this Disney Parks location by local talent. The creator(s) are a professional and unable to spill the secrets, specs and dimensions of the model, totally understandable, that.
I think we can infer that this model was likely derived from privileged access to production design notes. While it is possible, even likely that the film model and Parks model might differ in finish and details, I think we are safe to glean some details from this model for our hobby build.

Well, all that detail work.. felt a little like work. But the result is worth it, I think.


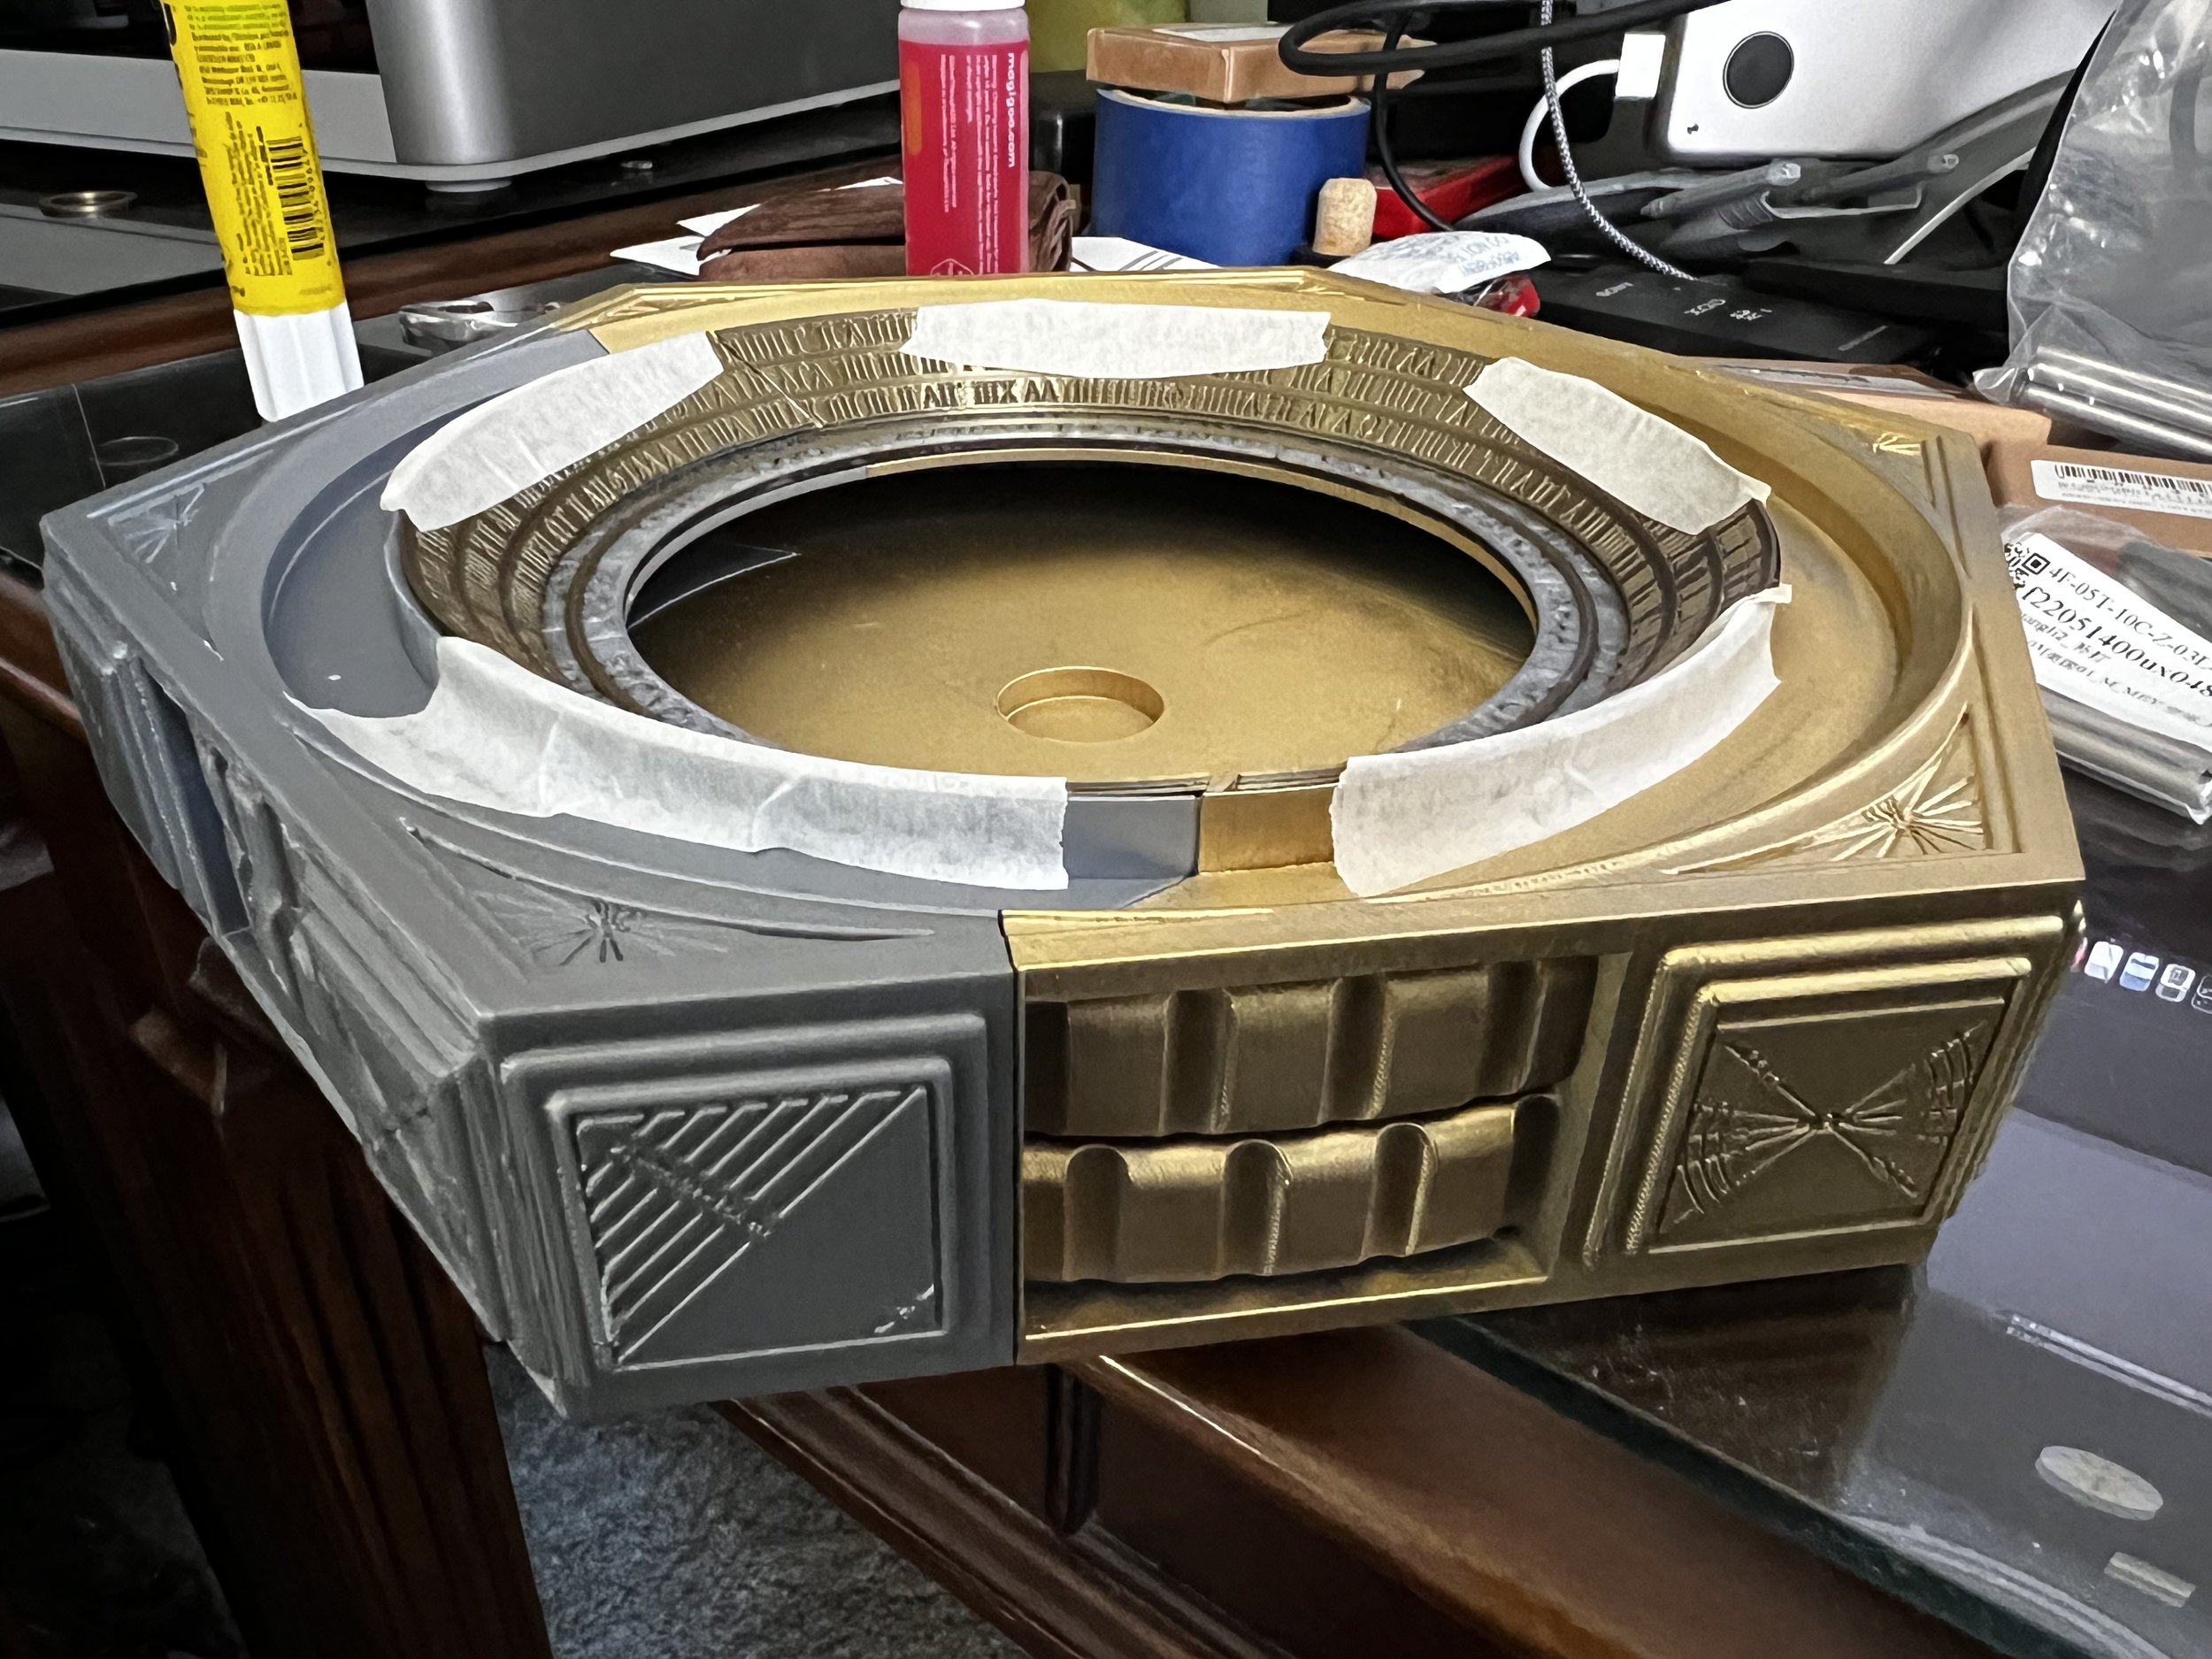
Splitting the Box


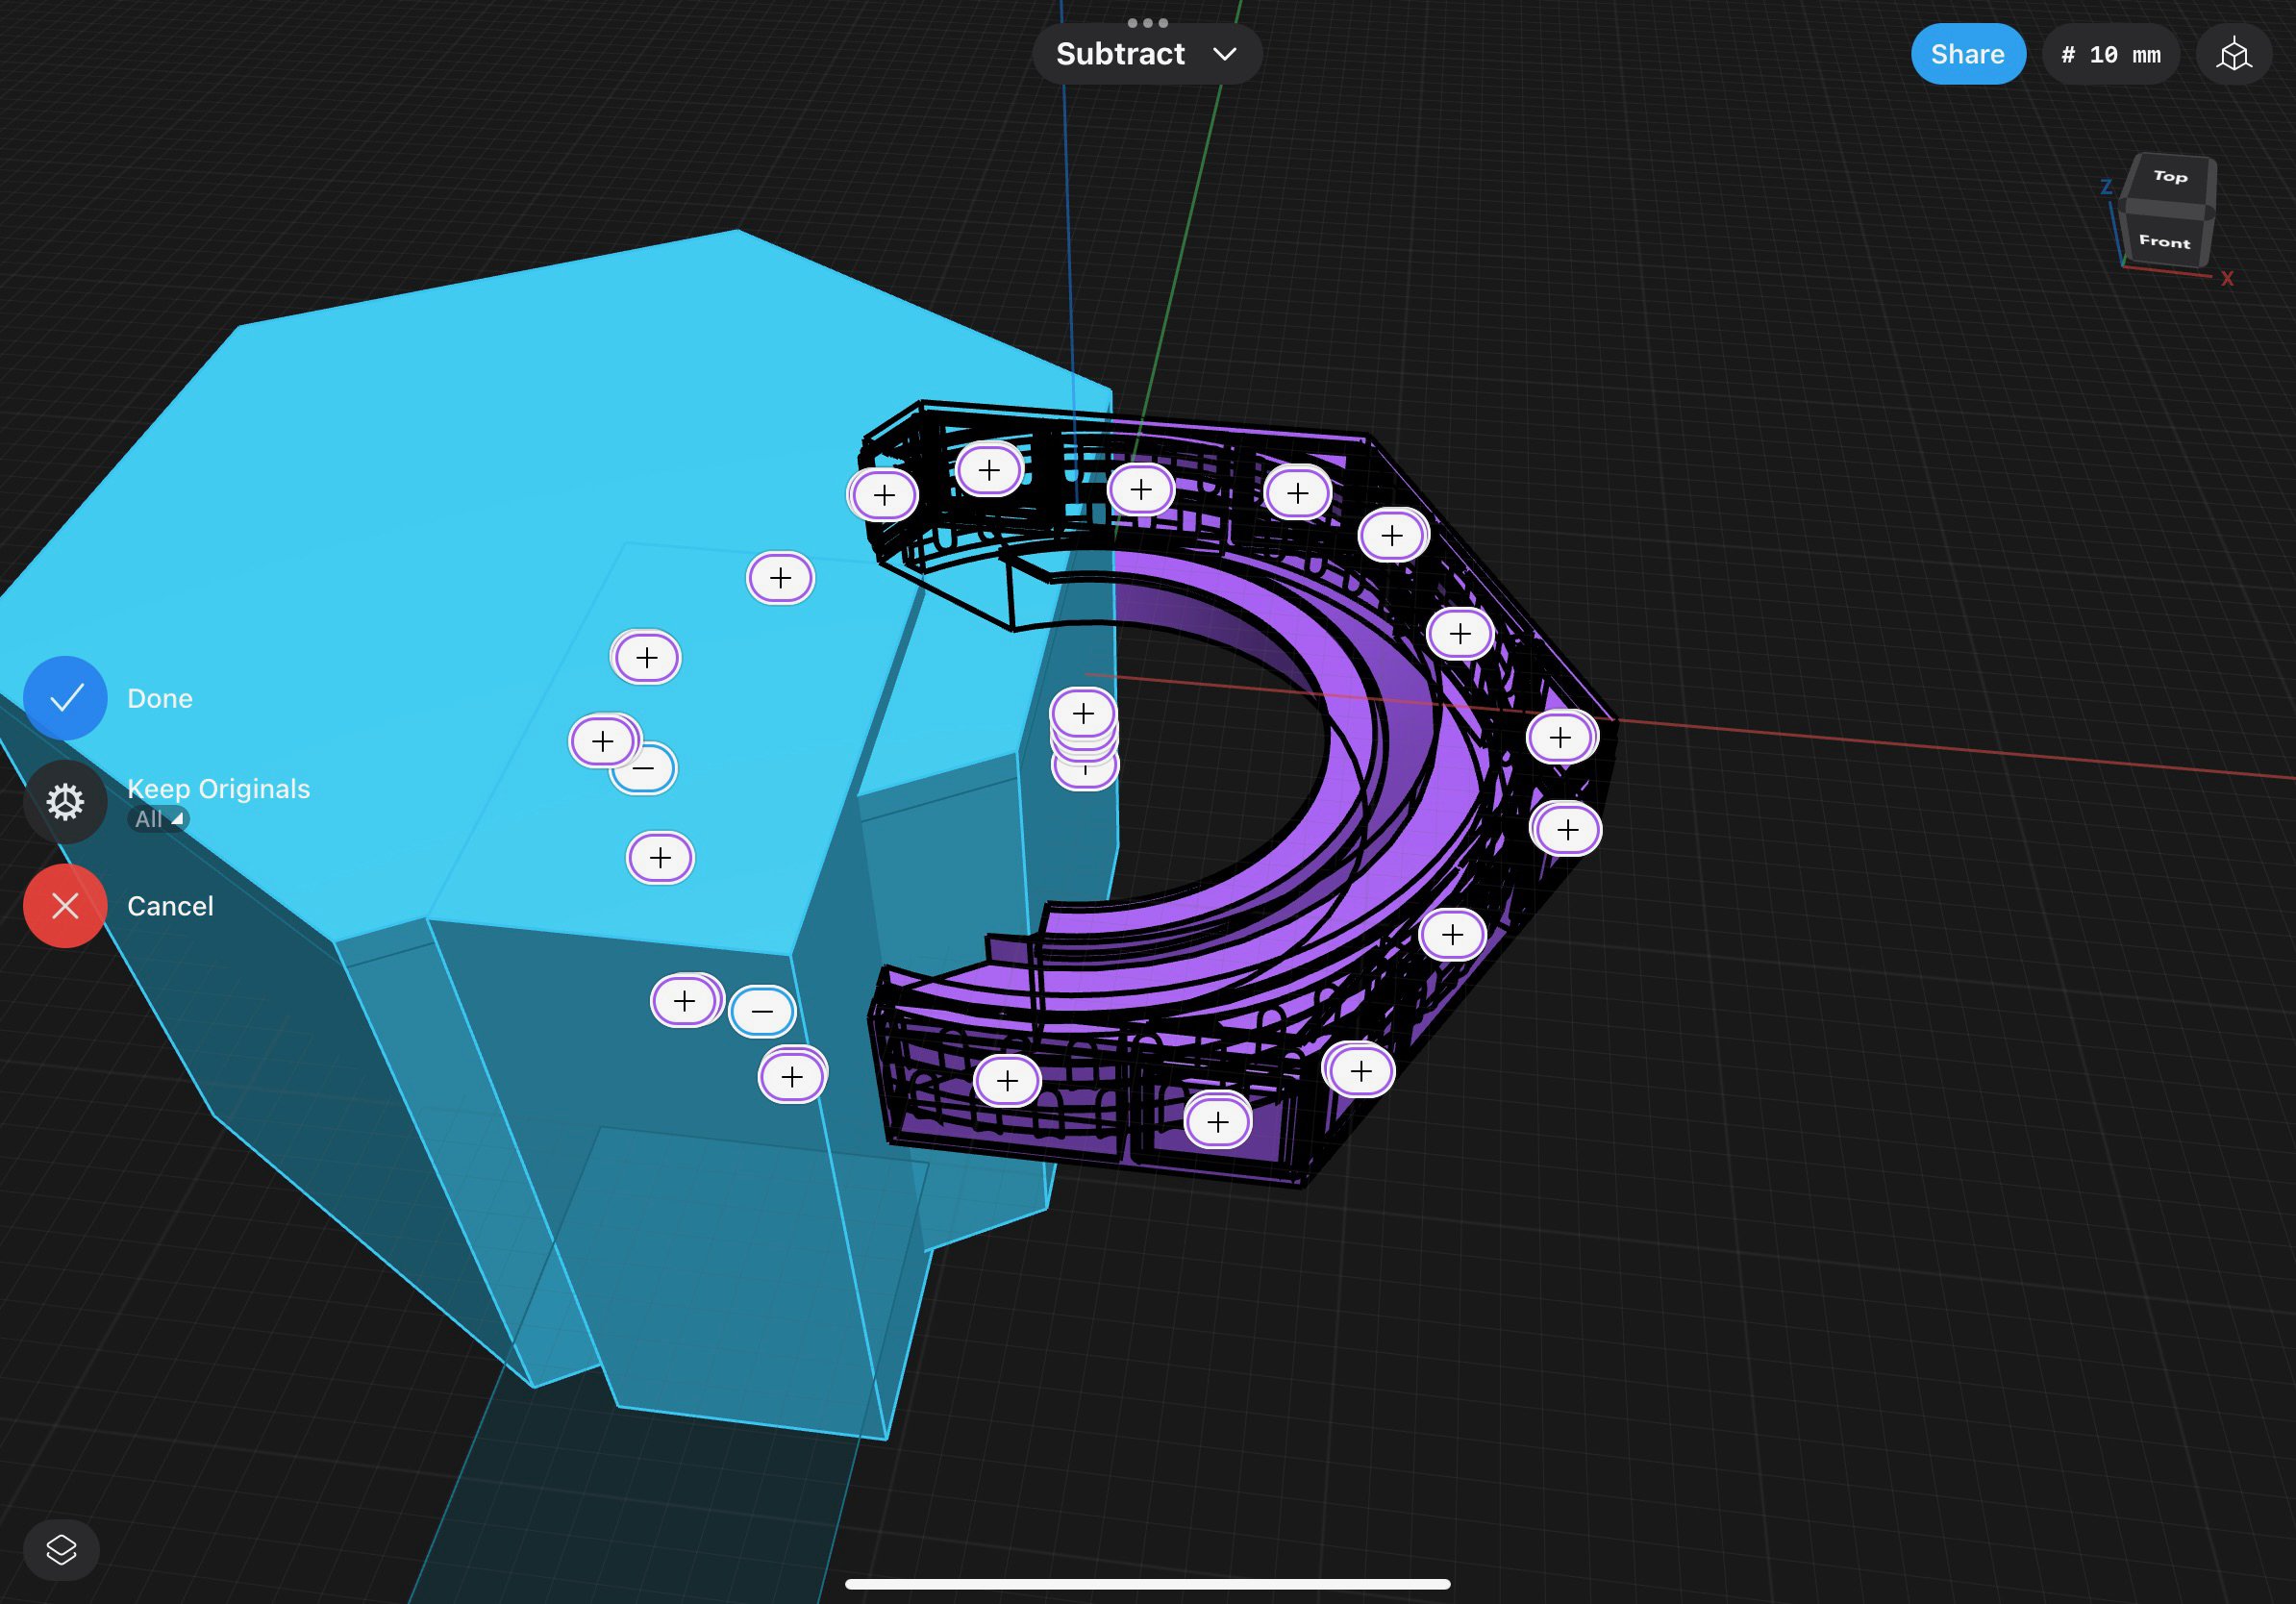
Having recently built the basement bar, I was thinking about the prevalence of jigs, cutouts and other build-assistance. While working out the line pattern in the upper white ring, I noticed that it is also based on a hex shape. So, I started to wonder if this is the answer for the the box split.
I’ve waited this long to tackle this particular problem b/c I think I secretly hoped the box would snap together and the seams would more or less disappear. I don’t think that’s the case, though. In fact I’m mostly sure of it after seeing these photos of the premiere model. I suppose it sort of tweaked my sensibilities that the box would be split where it is split but now I’m thinking this was another hex-jig-derived design decision. It seems like you can work out the cut points to separate the box by overlaying a 1:1 scale hex and positioning it so that the points no longer intersect with the inner inlay rail and rotate it so that it doesn’t interfere with the gear-box-cutout on the bottom side.
Dealing with Spares

At this point, I’ve printed a few prototypes and in some cases have doubled-back on design philosopy. Originally I printed the smallest prototypes on Bambu Iridium Gold Filament. Once complete, I wasn’t thrilled with the color match so I started painting them in either Rustoleum Gold or Krylon Golf Leaf paint. I found a Champagne Silk Gold filament that I liked for the smaller parts but the filament is inconsistently available and the brand name is very um.. Shenzen diversified whitelabel-ish. I’ve also been printing these in Antique Gold Silk Filament after a friend found a roll of something similar at a Thrift Store and sent it my way.
Why so many? Sometimes the filament is too dull or the paint is too shiny or the filament is tonally incorrect and the paint obscures detail work. A necessity of my work and family schedule is I seldom have more than an hour of uninterrupted free time to sit and design or experiment, results in an iterative design process. A byproduct of the iterative process is that I ended up with a scattering of parts printed or processed through varied combinations of material color and paint color choices.
Enough so that counting the three models I’ve printed for my own display since April, I have parts or have built more than a half-dozen of these. What to do with the spares? I gave one to a friend and two out on Indy and prop builder forums. I’ve listed the rest on eBay with 50% going to St. Jude Children’s Research Hospital, the American Cancer Society or American Heart Association. Kind of cool to clean out my parts clutter, deliver some cool props to fellow excited Indy fans and get a little charity feels in the process.
Update 7/16/2023
.. all of the Charity-share auctions sold. Raised a couple thousand for several charities. eBay’s charity fund isn’t quite as automatic and hands-free as I’d hoped. There are steps.. and fees.. so many fees.
eBay Results
The eBay sales of prototypes and partly finished props yielded the following:
1 @ $910 with 50% to American Cancer Society
1 @ $356 with 50% to St. Jude
1 @ $699 with 50% to St Jude
1 @ $245 with 50% to American Cancer Society
1 @ $1225 with 50% to St. Jude
1 @ $305 with 50% to American Cancer Society
1 @ $315 with 50% to American Cancer Society
___
$4055 /7 = $579 average
Not bad but I don’t think we’ve solved Cancer with this. Outside of the charity split, I also traded one for a metal-plated Coronado Cross and one for an improved Grail Diary. I’ve given a few away, as well. I started getting 100+ messages per week: “Make me one, sell me one, make me one, ship it to Germany, Italy, Australia, France”. eBay gets grumpy about those side deals, international shipping is atrocious and frankly 100+ messages per week is a bit too people-y for me. I kind of prize my quiet, simple existence.
Scarcity and release timing pushed the average sale per Dial up over $1000/per prop briefly. That’s the cost of scarcity and impatience of early adoption. Which is somehow both too much but also not enough to be worth my time as a side-hustle. 30+ print hours per dial + assembly time and other materials and trying to fake customer-service and sales skills that aren’t in my wheelhouse.
Eventually, I expect the usual prop-making Etsy crowd will start to fill this need with highly accurate original prop designs and prices will stabilize towards more reasonable levels. My plans will become the Great Value alternative to the AAA props. I’m cool with that.
After seeing the movie..
With the film being out and production secrecy embargoes starting to lift, more details of the prop have been trickling in. Folks have sent me stuff from twitter, forums, facebook - one person super sleuthing screenshots during the film which has been really helpful.
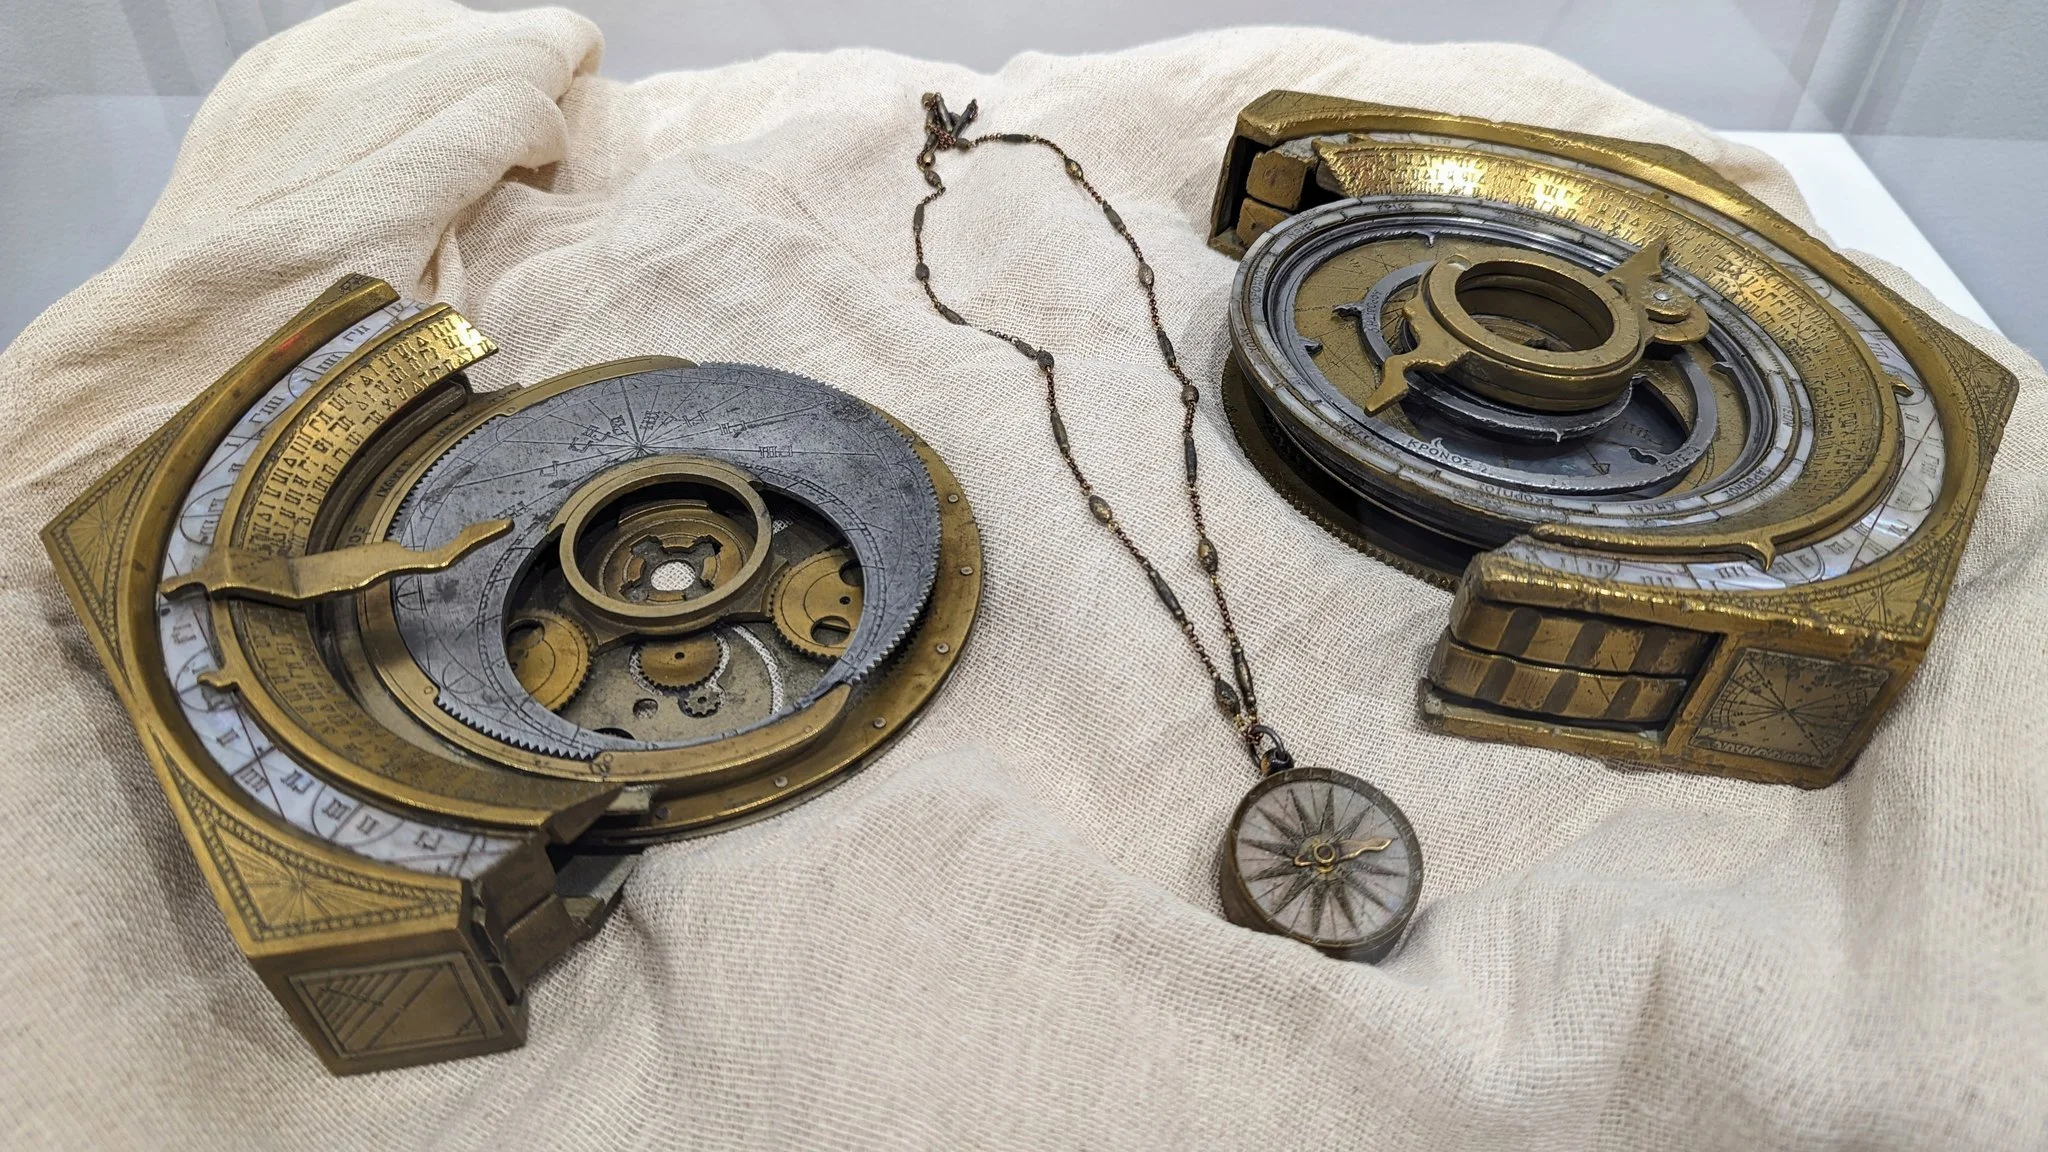

Observations looking at these is.. I got that bottom disc wrong, it looks like what I thought was the Glyph disc is actually a different prop from the movie, the Graficos (?) I think they called it. It looks like the glyph disc at the bottom is a fair amount simpler in design but it and the white rings are actually pearl which is a really nice touch and to my mind makes sense thematically. Seafaring ancient Greece would of course use Pearl thanks to its material properties as reasonably hard but still workable. Would could imagine that Archimedes might have come to appreciate pearl for the concentric nature of their development.
The internal mechanisms of the production prop seem reminiscent of a planetary gear, to my untrained eyes. Though, I’m not entirely sure it functions like one, if at all. if you look there are certainly a number of static gears in the assembly that seem to be just there as interesting bits.

working on refactoring the center area, improving the split box design.
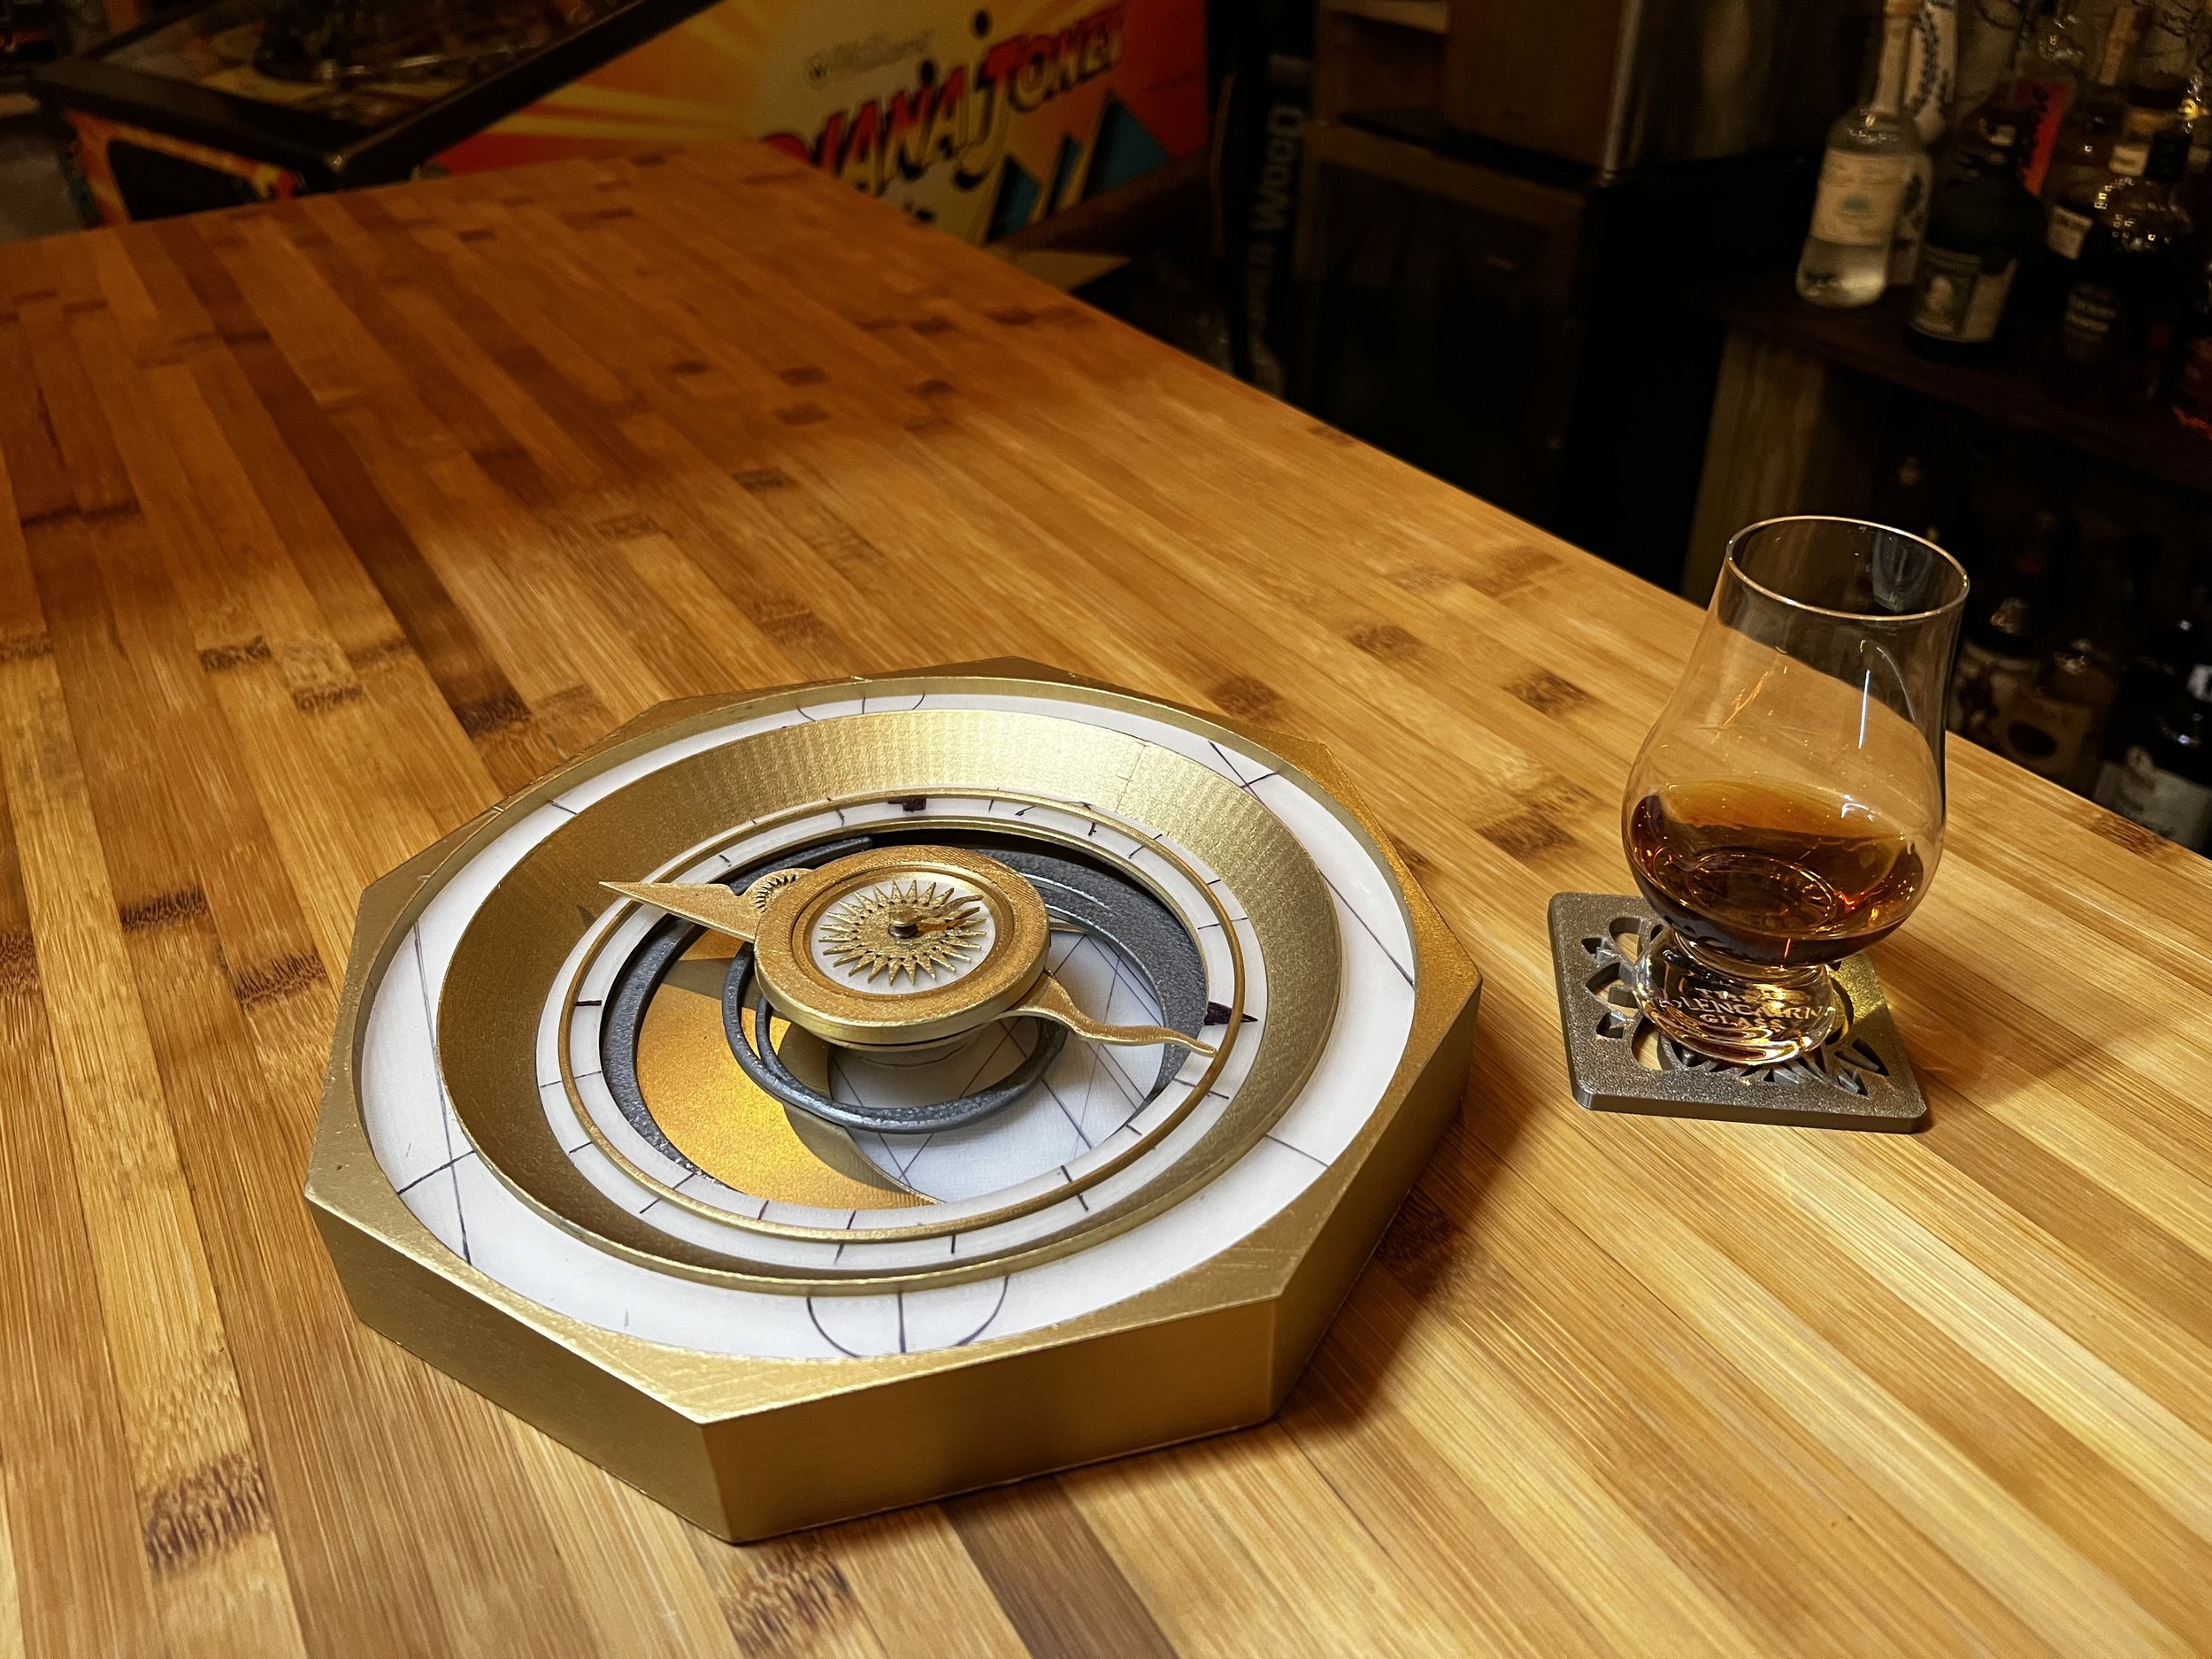
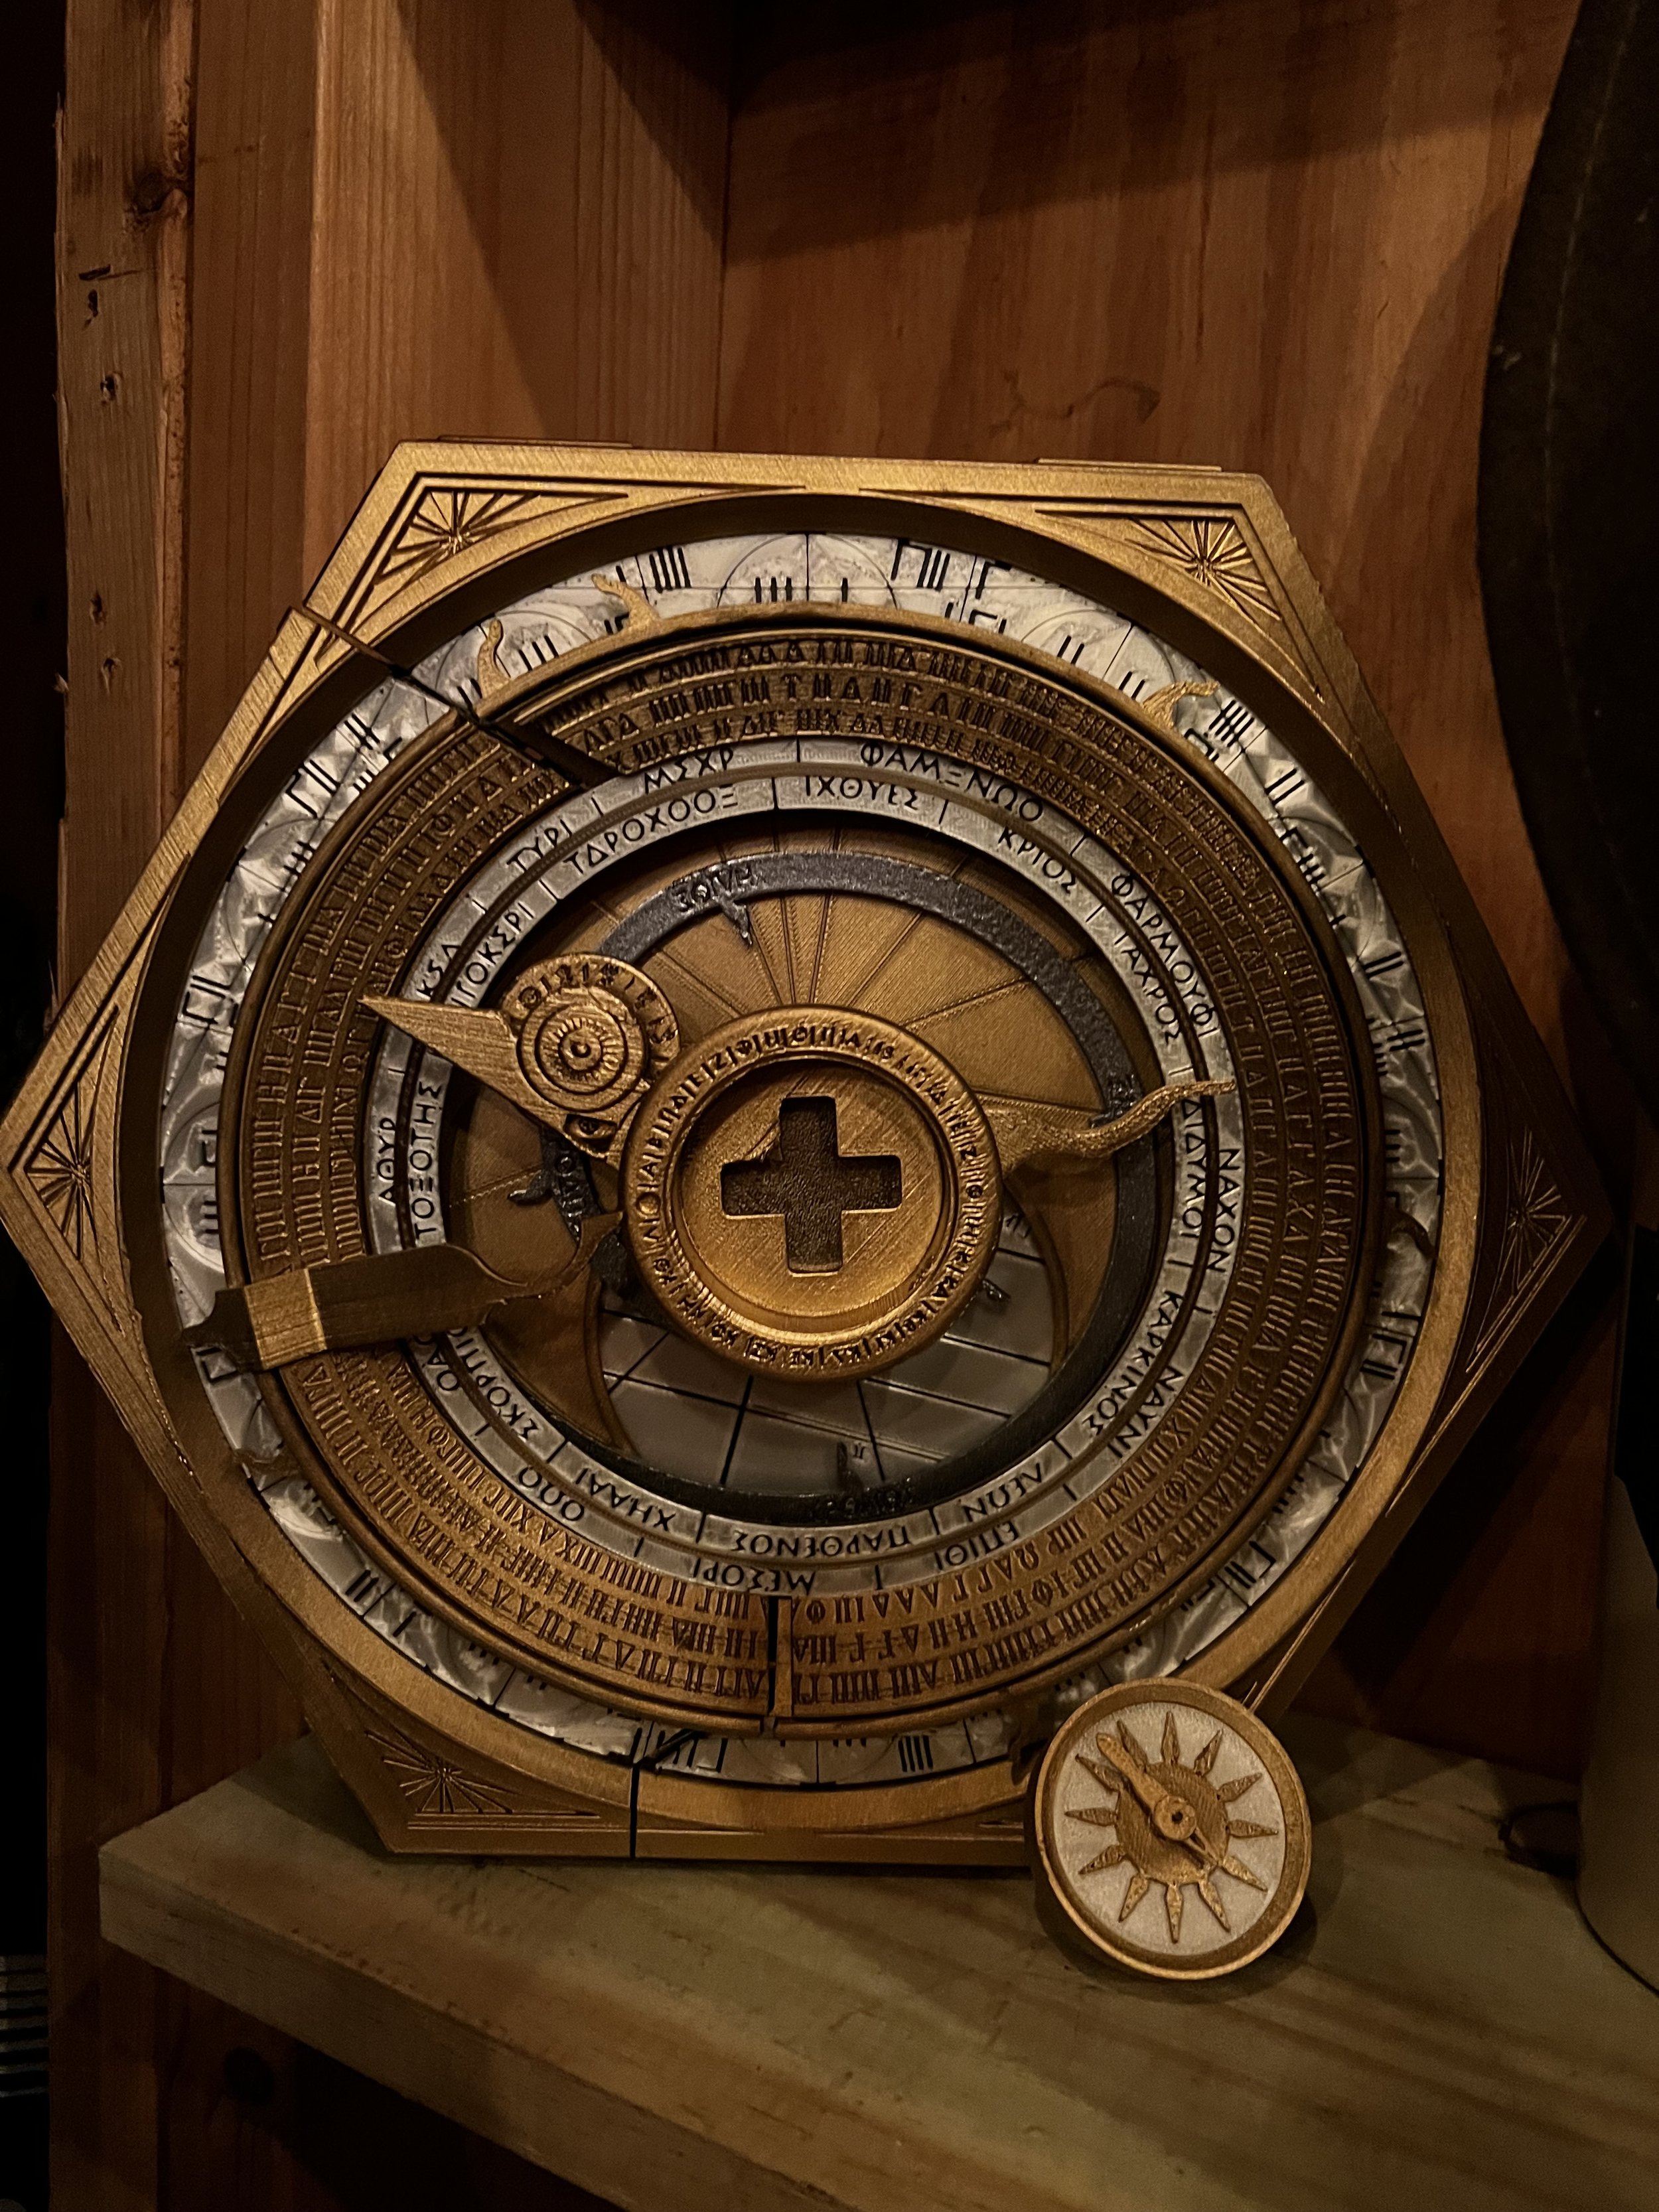
Mark 3.5

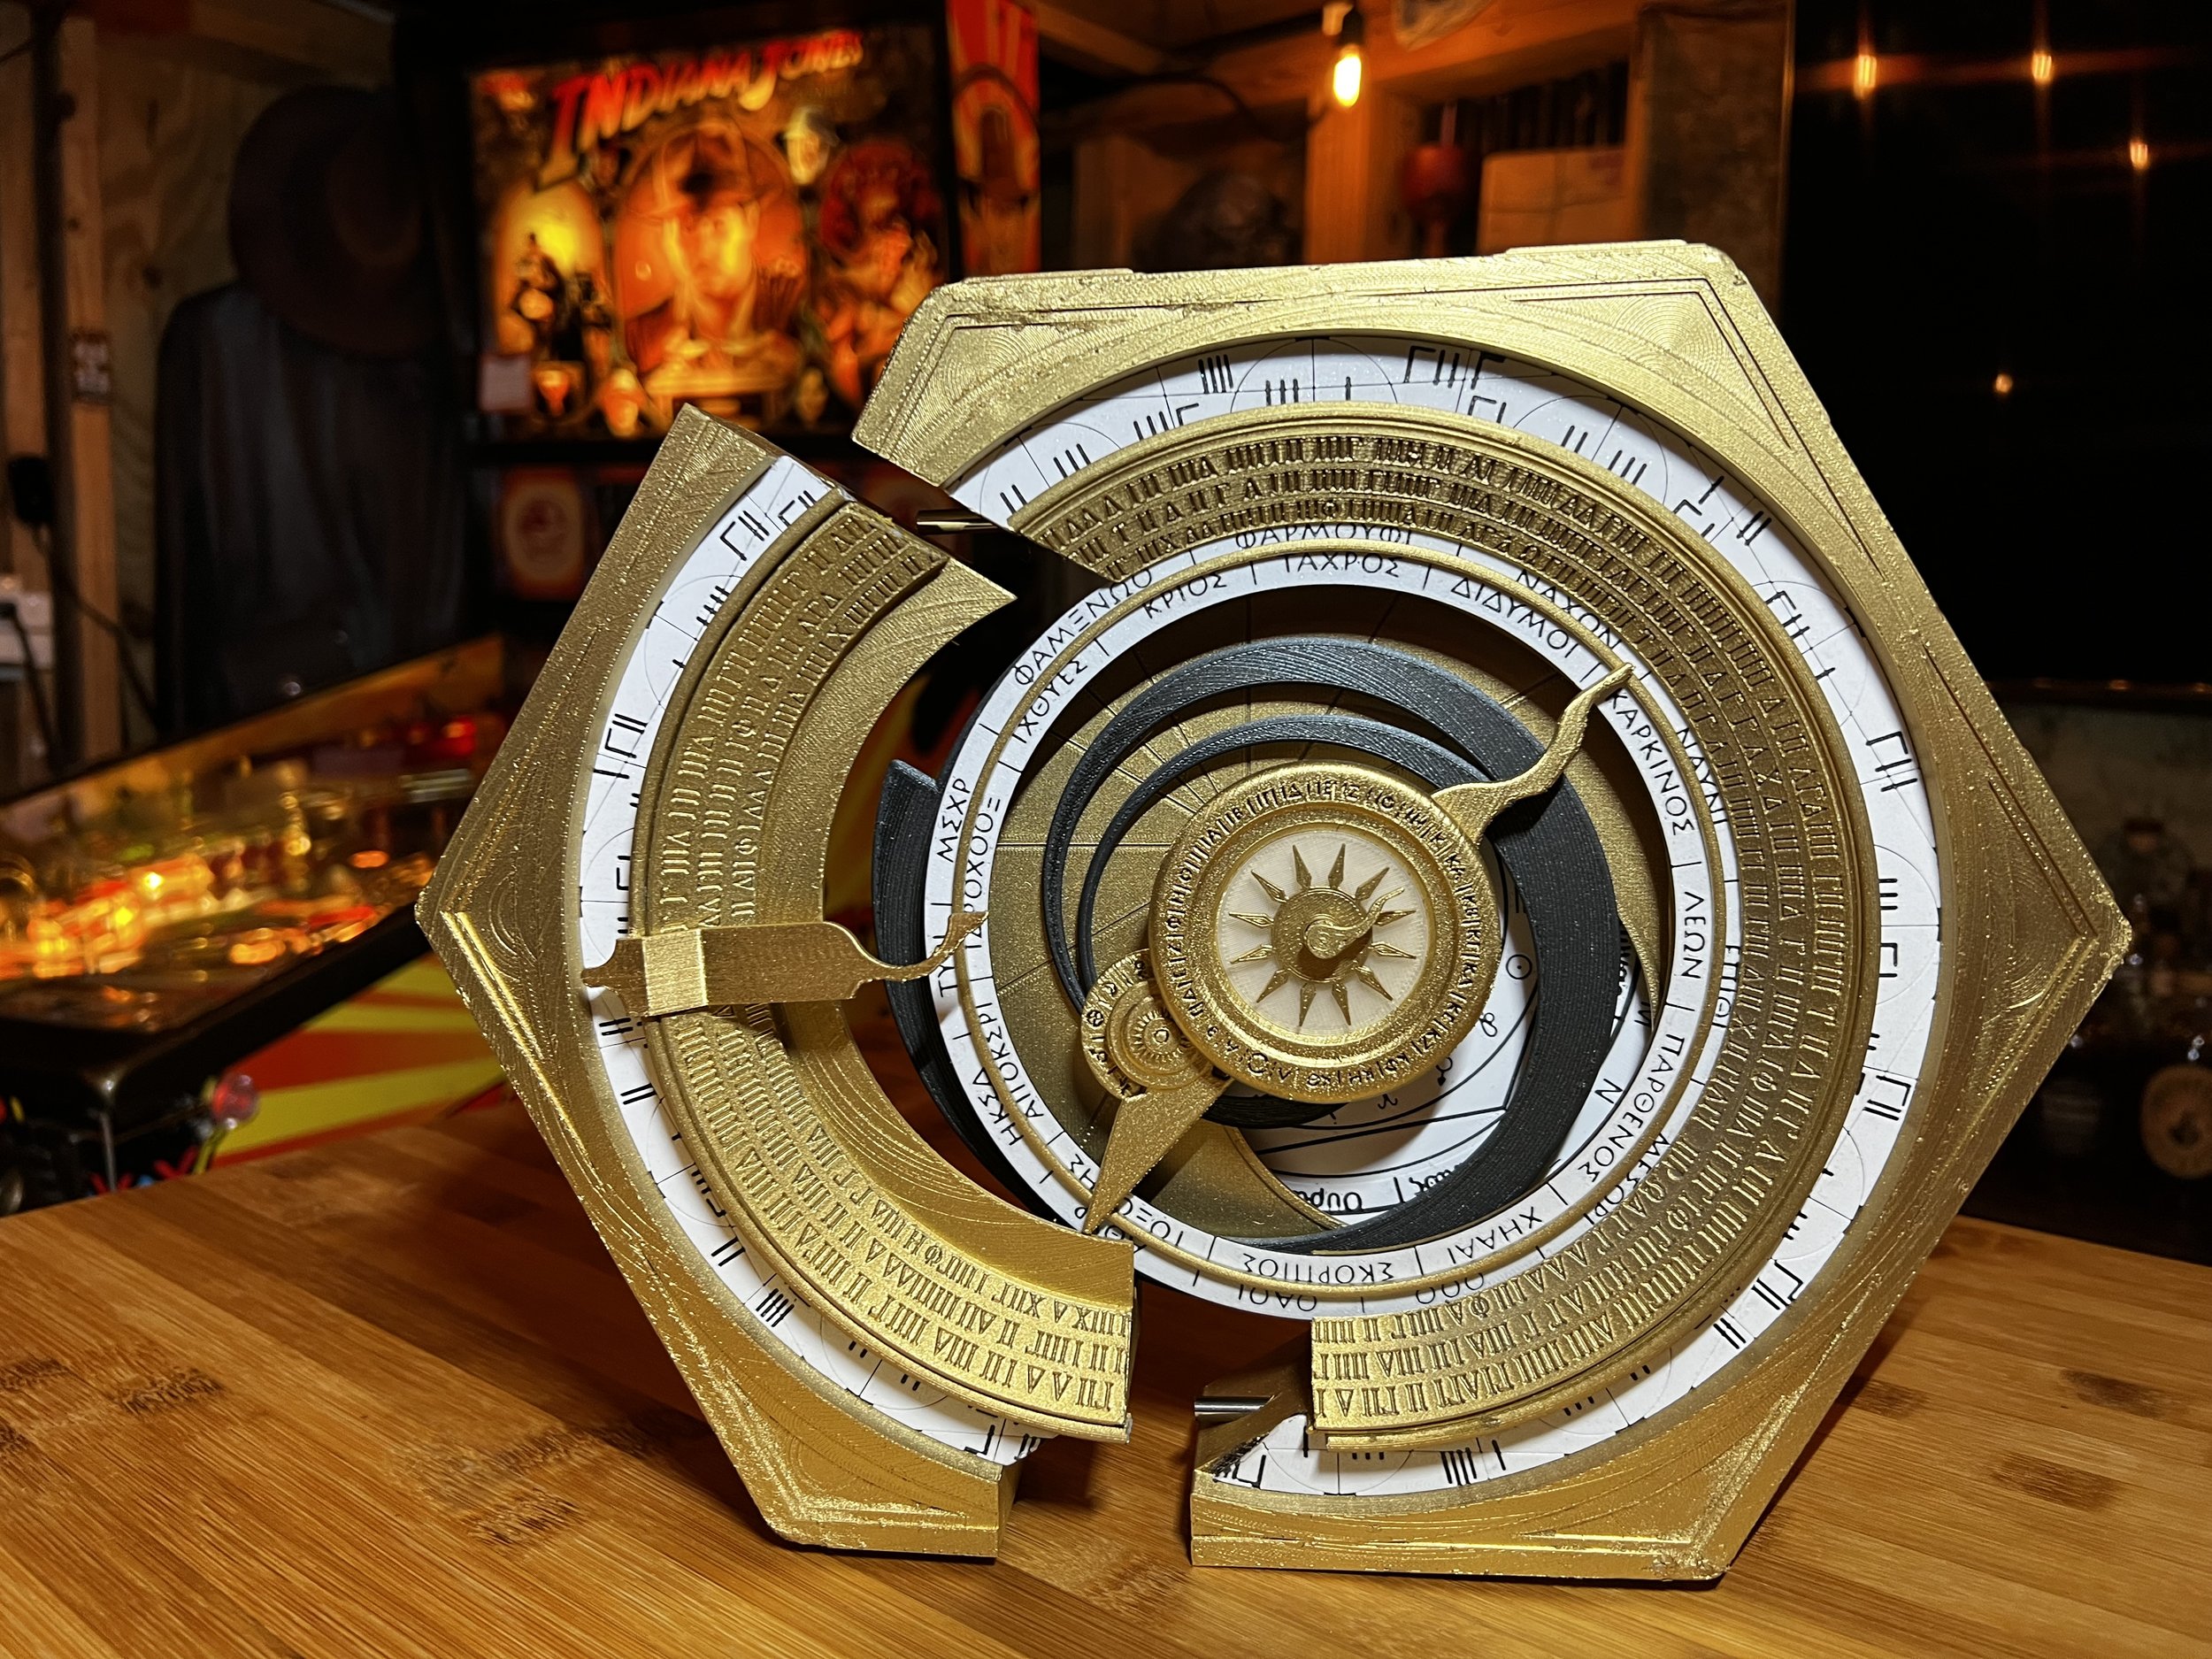
This iteration smooths the out inset slope, adjusts the ring diameters for lost consistency through over-processing and scaling mistakes and adds some of the side plate details by borrowing from the Disney Parks prop and the film prop. (Their plate layouts are different) Combined with the new compass design and the split build, I think this looks alot like the film prop, minus the internal gearing complexity that doesn’t seem to actually have any function.

Completed Assembly for the Mark 3.5 Design. This is my stopping point for awhile.
Remaking my own Dial based on the new designs.
Side A Print
Side B Print
Outer Inset Ring
Scammy McScam-Face
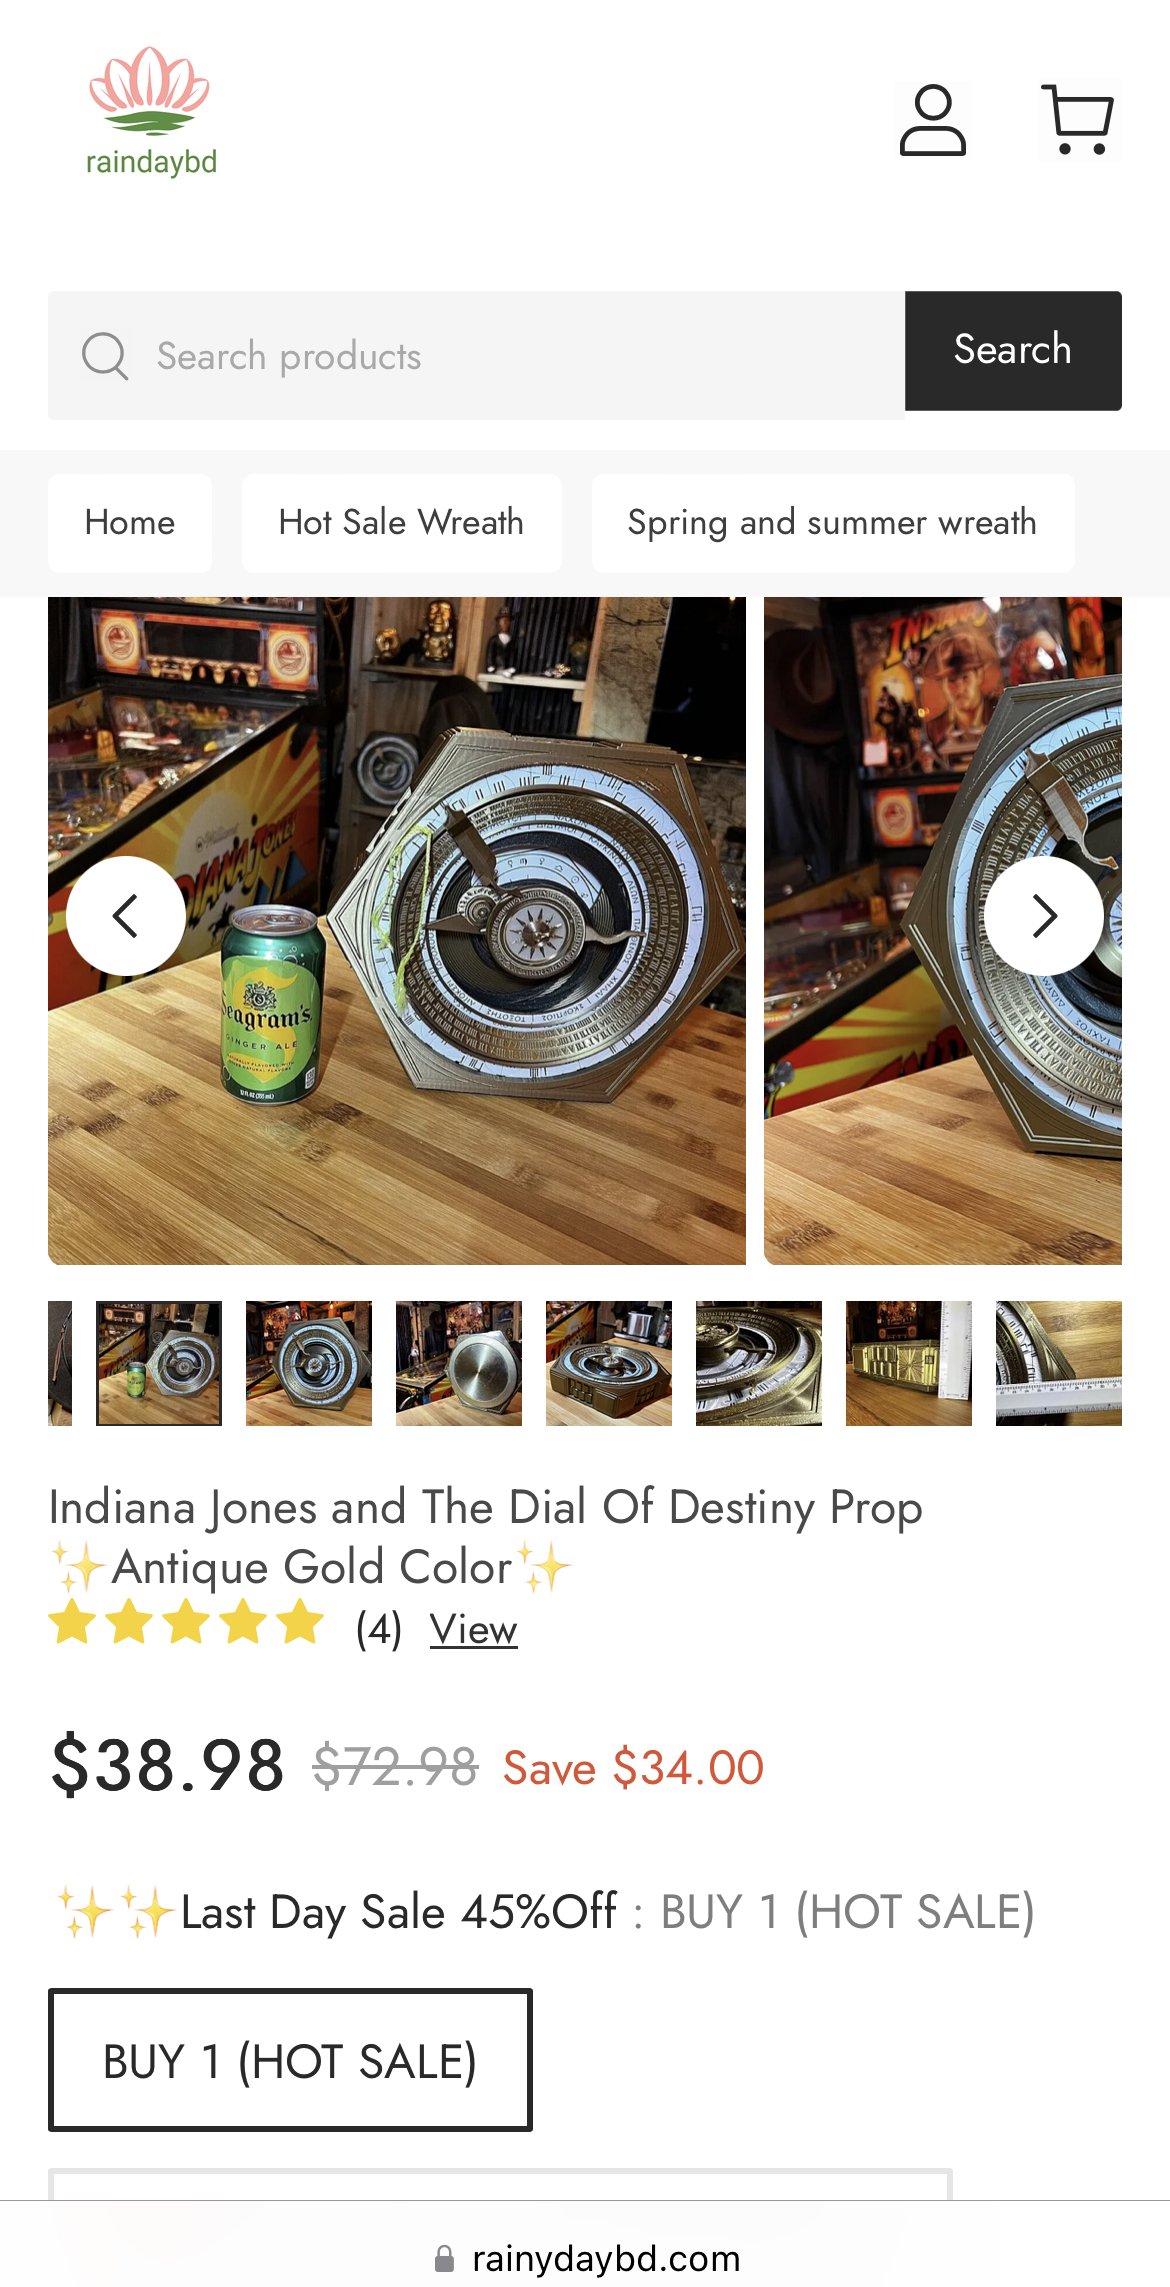
This site is a scam. It will disappear under this domain and pop up under a new domain with similar style, layout and copy.
An idle Saturday enjoying the backyard with the family while we have a brief reprieve from the extreme temps to just regular jungle-like Alabama normal temperatures. I come in to fetch some ice cream and I see an angry message notification from someone who bought one of my Dial prototypes on a Charity-Split auction on eBay. The person is pissed because they found a site (probably a facebook ad) for a Dial of Destiny Prop for $38. When you click through there are various screenshots of various iterations of the prop harvested from eBay and therpf.com prop builder forums and other sites.
One of the fake reviews if even from: -BillD

must..not..shift..into.. super-asshole mode.
.. a little known weakness to PayPal’s buyer protection is this:
The scam seller can ship an empty envelope or box to anywhere in your ZipCode and that suffices as “proof of delivery” for a giant, understaffed and over exposed payments processing company like PayPal.
July 28th Update
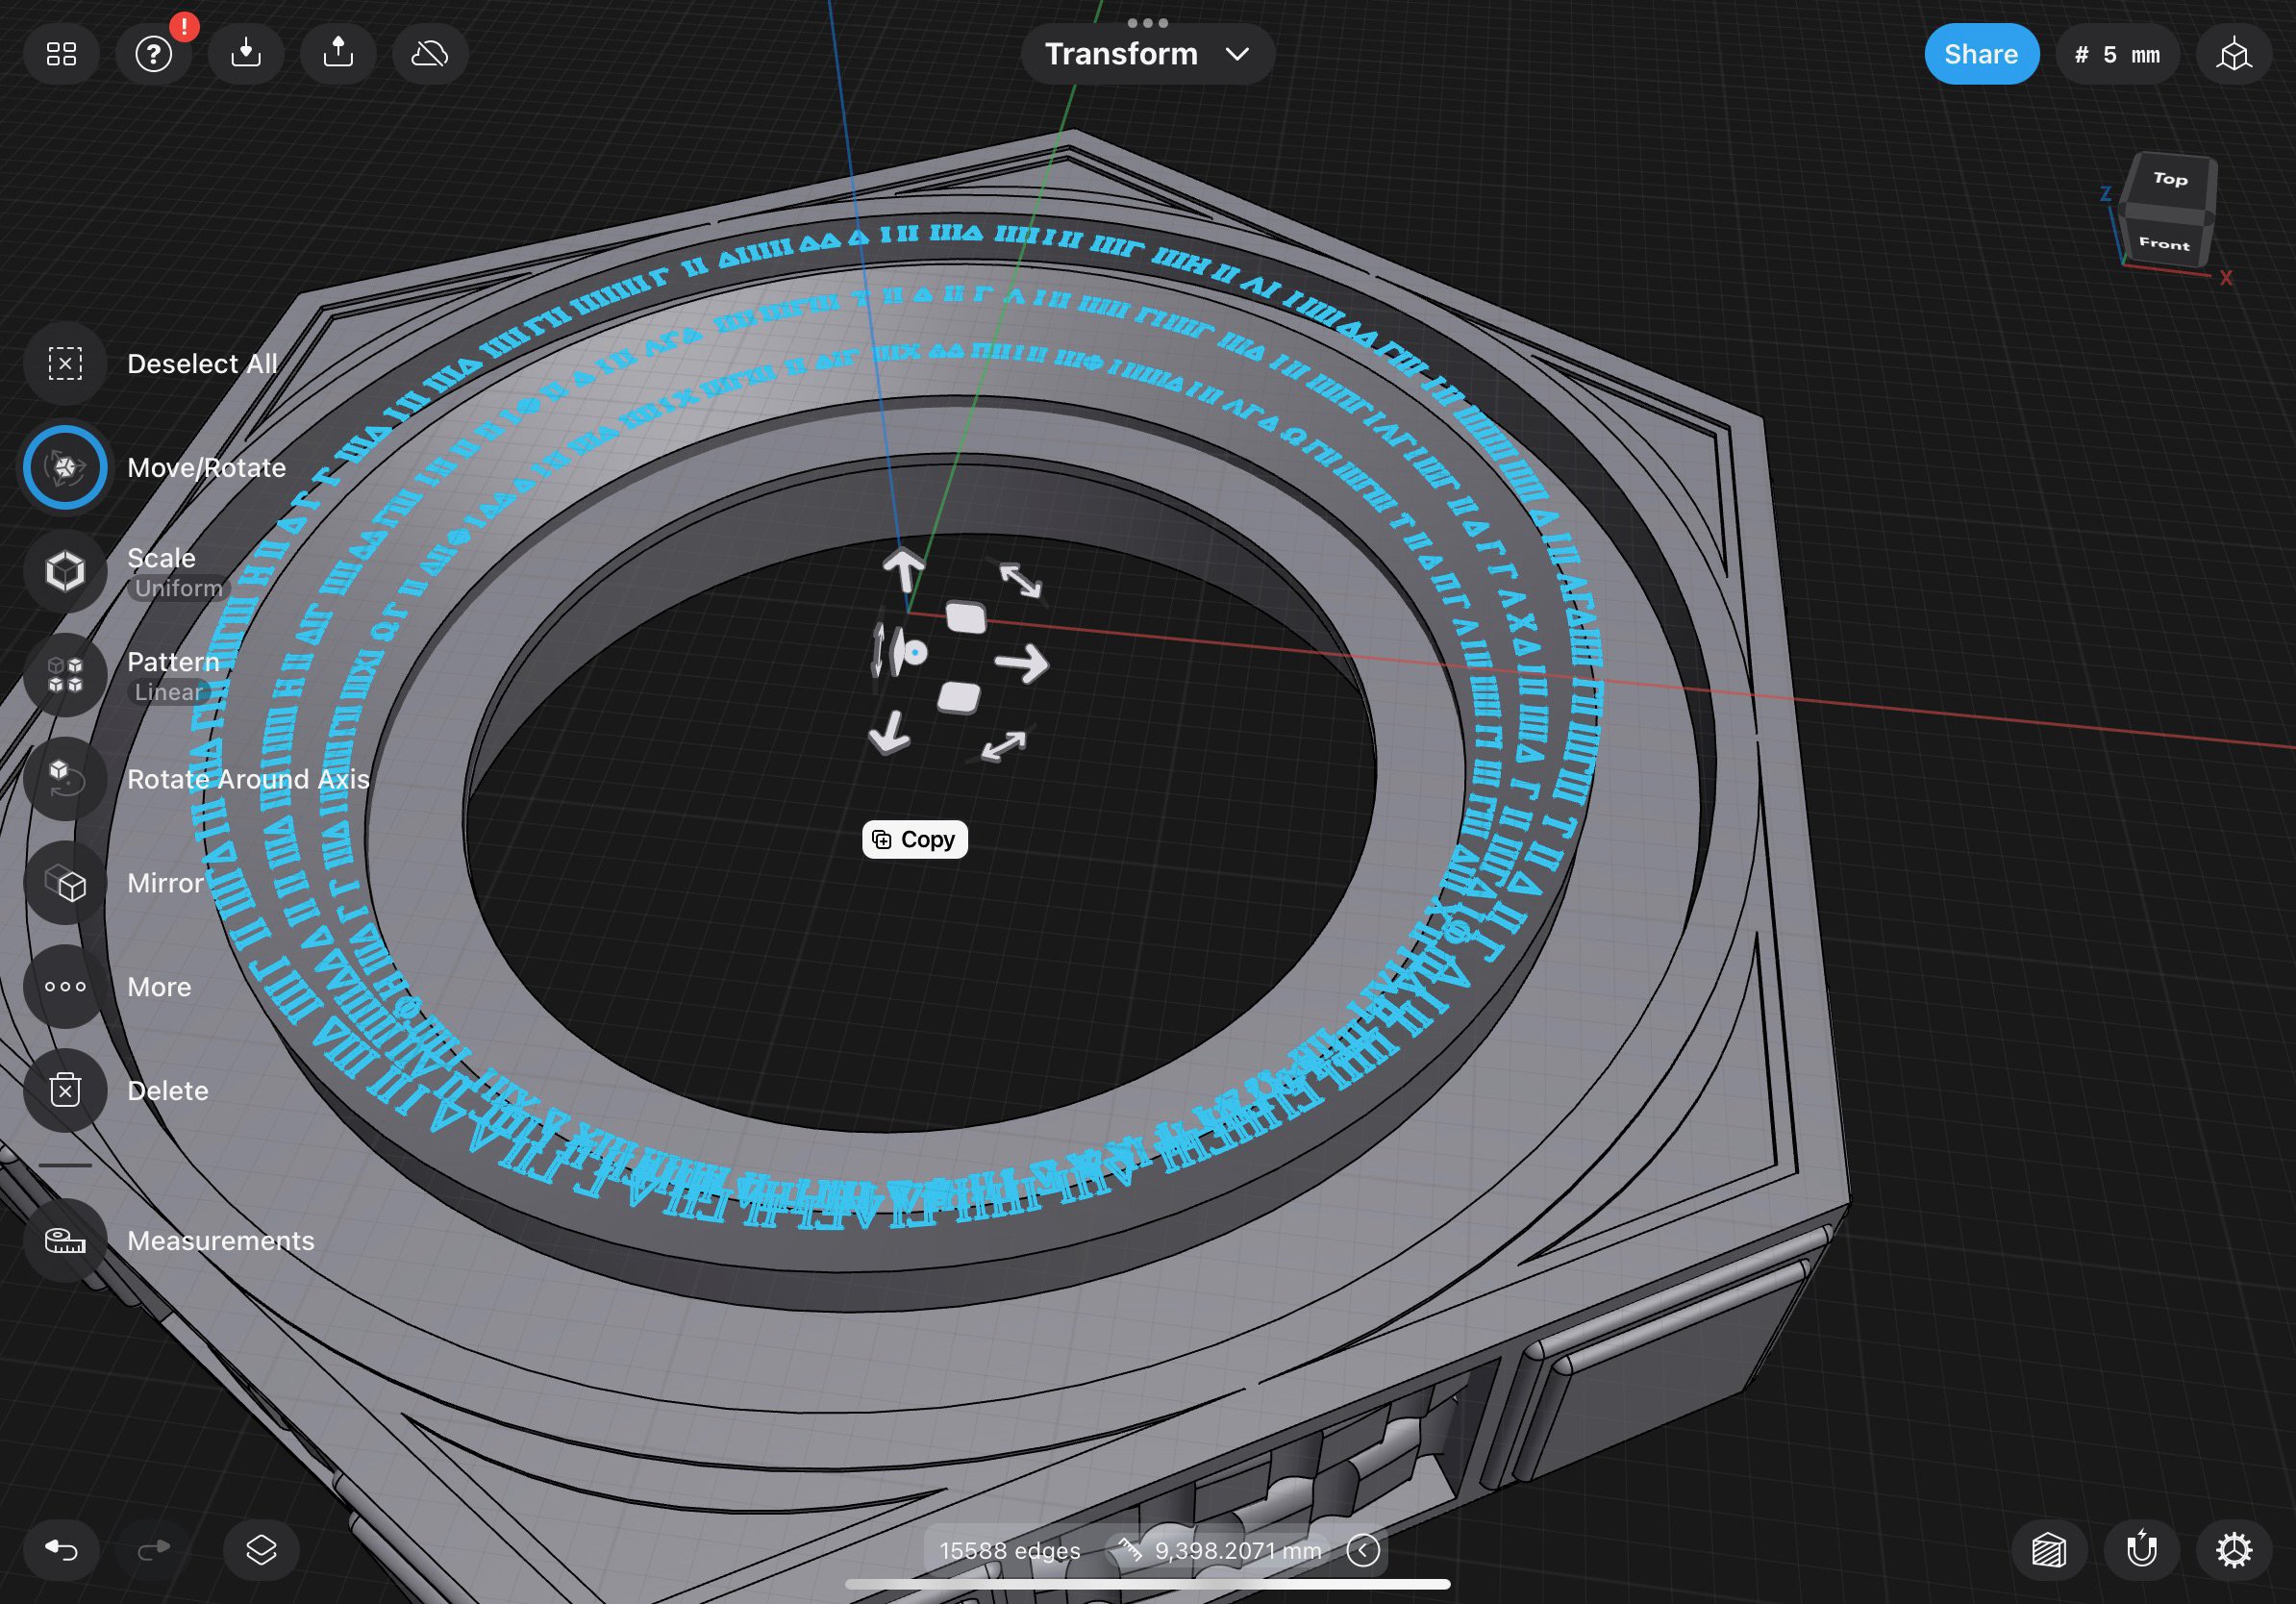
My interest in this has plateaued but I did find a few minutes to tinker around the spiral design. It still isn’t 100% movie accurate but it is an improvement.
Final eBay Activity
I have material enough for maybe 4 or 5 more, 2 of which will go towards funding some printer maintenance and/or a cheaper secondary workhorse printer for future projects, probably a P1P and to pay down my eBay fees invoices. I’m not ordering any more material after this run. Anything I have available should be gone by mid-to-late August but fret not fellow Indy fans, rumor has it in the prop-maker-forums that even more accurate versions are being made and sold, coming soon to the Etsy-verse. That’s awesome.
Fall, 2023: Project Conclusion, Final Thoughts

Time to move on from this project. Had some laughs, learned a few new skills, raised a little money for charity and achieved the primary goal of making a beer-goggles passable Dial of Destiny Prop. There are still plenty of prop details left to resolve and there are some creative and highly detailed props out in the wild from more talented folks on the horizon.
When this project started, I just wanted a thing and couldn’t find anyone from which to buy thing. Over the 3 months of effort, a few meta observations have come into focus.
Acts of pure creation are fun and talented people are amazing.
Just like walking through an arts and crafts festival, poking around the prop maker forums on the internet is a fascinating exercise. The amount of care, time, expense and level of detail that go into these efforts are impressive, if not intimidating. Just like the arcade and pinball restoration scene, actually.
In-group cliques w/ protectionist concerns, outsider-skepticism & fear of commoditization amongst prop builders
Early on, the only Dial for sale on the internet that I could find reference to was located on a private facebook group. A particular subreddit required a portfolio of related work prior to joining. Some forums were more open to outsiders than others. They have their own lexicon, their own set of taboos and their own [implied] blacklists of taboo-violators. There was an underlying theme in these communities of concern about Chinese scam sites like the one above and more generally the commodification of the work as hustle culture and collectibility sensibilities collide.
A narrative of a hyper-competitive, often mean-spirited and darker side of the Etsyverse that I wasn’t aware of formed. I guess it never occurred to me that Etsy sellers would be sniping at each other but they do. Paranoia around trying to maintain artificial scarcity fueled by fear of a diminishing or saturated market keep some of these folks up at night trolling forums in classic keyboard-commando fashion. Just like the arcade and pinball restoration scene, actually. I almost started an Etsy store to sell these things but decided against it. Anything that might invite drama and work opposite of my love for the franchise is a big no-thanks.
Although, zooming out a bit: There is comical irony in a bunch of prop nerds and artists building a recurring revenue stream from recreating replicas of actual Hollywood prop masters who were paid once for their work. Being so precious with their own copy of someone else’s’ original work while being aggressively protective of their own copycat coke formula.
methinks thou dost protest too much.
This, I think is a unique aspect of commercial art vendor circuit. A nugget of a thought that occurred to me walking through the Epcot Arts and Crafts festival watching vendors sell for a premium their own interpretations of other artists’ and animators’ work. I wonder if those original animators (many of whom were laid off a decade ago) are getting a cut of the licensing? You don’t have to hang around long to hear the vendor in one booth talking shit about the vendor from another booth. I guess capitalism isn’t a team sport.
Thinking on the protections that these artists try to mask their work with and all of the signs saying “no photos, please.” That’s ironic right? No photos of my copy of a thing that was derived from something that literally aired on ABC during the Wonderful World of Disney.
People are weird animals.
This is an abstraction of the AI conversation in the current Zeitgeist. If a drawing of a drawing is art, is a photo of a drawing still art? If you stare at enough art, it creep into your own creative output, just like the training data for generative models. These are complex topics for a blog about retro-nerd stuff, so.. I’ll leave it there for now.
Our princess is in another castle
Just my opinion: considering the box-office take of Indy 5 and how promotional budgets in the studios work, I don’t expect to see an official prop anytime soon. Hopefully I’m proven wrong.
Throughout this post and to this point in time, I made a prop that was “close enough” for my own purposes and with enough whiskey your mind will resolve it as accurate, even though it isn’t really accurate. The dimensions were a guess, constrained by build-volume. The glyphs were pixel-peeked from theme park photos and further extrapolated by astrological signs. The internal dimensions were resolved through relational geometry and natural constraints and the hidden internal details of the film prop are far more elaborate.
On the OCD scale, where 1 is a deformed pizza box and 10 is the film prop, this is a 7 by my estimate. Keep an eye out and I’m sure the real prop makers will eventually rise to the challenge.
December 2023: Getting Pulled Back In
I thought I was done! (again). I guess not! (Again)
Social Media. I should stay off of it. Around early December on one typical four-espresso morning waiting on a meeting, my phone vibrated with a social media message from across the Pond. Summarized as follows:
”I’m in [exotic place] (by standards of South Alabama, anyway) I’d like one of your props.. but there are two issues I’m concerned about. Layer Lines and Support Scars. “
In my little mental red flag push-pin map of places that I’d sent Dials, this particular locale spoke to me. I’m being vague here… on purpose. Just to highlight the innovation-motivation without calling attention to an individual in the Indy prop communities.
I know that I could make a Dial without layer lines and without support scars, I made plenty of them but it was hard work; a lot of sanding and post-processing of the parts, which drove the time (and price) up. But, since I took a break over the fall from making Dials, a few things didn’t set right with me about the model as I left it.
Issue: I wasn’t happy with the way the conversion process, particularly the danger of breaking the eyepiece part while unscrewing the compass mount. No one (but me) appears to have broken one but still, I wanted to improve this mount.
Proposed Solution: A slight redesign of the screw-plug to introduce a magnetic coupling. Working on my Johnny Five project, I’ve been experimenting with magnets to give some parts a natural resting position and to aide in disassembly and storage. Its something I saw Titan Ross do over at Titan toys on his smaller J5 builds to hold the arms into the shoulder sockets while still allowing rotation.
Issue: I wasn’t happy with the FDM print process. I mean, the bambu printers are great but the post-processing steps to add weight were cumbersome. When someone would buy a Dial from me, I added pour-channels and plugs to the Side A/B parts and filled them with a concrete-like mixture. The weight was good but the balance was off. Also, it was messy.
Proprosed Solution: (Read in Austin Powers voice) Resin, baby. Yeah.
(Resume normal internal monologue voice of George Carlin) In order to build a Prime Radiant, I finally picked up a resin printer. Then another. Then another. Then another. The full-sized / large Dial wouldn’t fit on my Elegoo Saturn 3 Ultra but does work out on an Elegoo Jupiter.
Issue: I know I was missing some details like: the edge ripples on the box and the lines on the viewfinder disc.
Proposed Solution: Adderall and design-focus-time.
Issue: I wasn’t happy with the organization of the project on printables. It was clutterd.
Proposed Solution: Declutter it while also adding additional build sizes. (200mm, 205mm, 210mm)
Mark 5
Mark 4 became Mark 4.5 which became Mark 4.6 which eventually became Mark 5. Mark 5 is the Mark 4 design with a few details added to the box corners and fixes for the 3 items listed above that are backward compatible with the older designs. MODULAR, FTW.
I’ve mailed off a few samples but I’m pretty excited about this update. It just “feels” right.

Mark 4 Corners

Mark 5 Corners